Pranay Rana: 2013

Saturday, November 23, 2013

Misconception of Dyanmic type passed to function and type returned

Small post is about miconception related to dynamic type variable supported by the C# langauge. Read more about dynamic keyword over here : Dynamic Types

Check below code
dynamic str = "22/11/2013 10:31:45 +00:01";
var withOffset = DateTimeOffset.Parse(str);

According to written code most of the developer thinks after wiriting above code type of "withOffset" variable is type written by the function "DateTimeOffset.Parse" i.e. "DateTimeOffset".

Devloper of the code thinks that compiler treat "var withOffset" as DateTimeOffset and all the method / property is avaiable which is avaialbe for "DateTimeOffset" type is avaible for "withOffset" variable. But its not true.


So question get raised why the type of not get changed to return type of the function.

Answer is :
When you use dynamic, the entire expression is treated at compile time as a dynamic expression, which causes the compiler to treat everything as dynamic and get run-time binding.

This is explained in 7.2 of the C# Language specification:
When no dynamic expressions are involved, C# defaults to static binding, which means that the compile-time types of constituent expressions are used in the selection process. However, when one of the constituent expressions in the operations listed above is a dynamic expression, the operation is instead dynamically bound.
This basically means that most operations (the types are listed in section 7.2 of the spec) which have any element that is declared as dynamic will be evaluated as dynamic, and the result will be a dynamic.

Since the argument is dynamic, the compiler cannot know which method will be called at runtime. Therefore, it cannot know what the return type will be. We might know that the return type will be DateTimeOffset, but the compiler does not, and cannot, know that.
Reference : http://stackoverflow.com/questions/20150687/c-sharp-dlr-datatype-inference-with-dynamic-keyword

Monday, November 18, 2013

Help Yourself in Debugging (Part-2) using Breakpoint/Tracepoint

Read Part 1 : Help yourself in Debugging by using Call Stack and Immediate Window
In this post I am going to discuss about the “BreakPoint” which is one of the most used feature by developer to debugging application by breaking execution of program runtime at certain point. I am going to describe the feature provided in visual studio for breakpoint and how it’s useful for debugging code easily.

What is Breakpoint?
Breakpoint is feature provided in Microsoft Visual Studio which allows breaking execution of code at runtime when debugging application.

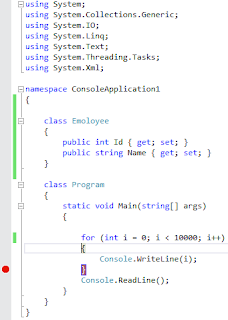
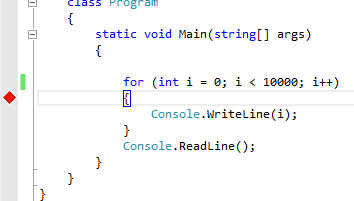
For Example:

When you click on side of the code in visual studio it setup break point in you code as displayed in above image. So when you start execution code it will break execution at this point.


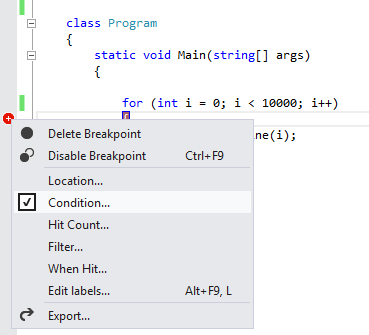
BreakPoint Menu (Option for the Break)


Above image display the context-menu for breakpoint i.e breakpoint menu. Following describe the all the option one by one.
  1. Delete Breakpoint
  2. This option of the breakpoint menu allows removing breakpoint.
  3. Disable Breakpoint
  4. This option of the breakpoint menu allows disabling breakpoint, so the breakpoint just get disable and become gray. Useful when developer just want to execute code without stopping at breakpoint and later on enable when want to use it back.
  5. Location…
  6. This menu option allows setting break point at given location i.e. at given line in source code file.


    When click on the menu it display dialog that provide information about source code file, line number in code and character. This dialog allows changing line and character information.

    For Example:


    Change line number to 26 in the in dialog than it breakpoint change to line number 26.


  7. Condition…
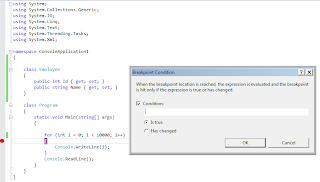
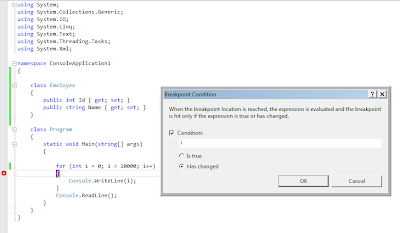
  8. When this option clicked it below dialog get displayed which has two options.
    • (A).   IS true
    • This option allows setting condition for breakpoint, so according to this execution during debugging get stopped at breakpoint i.e. breakpoint get hit when condition satisfied.
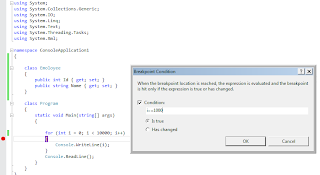
      Fox Example:


      As in above image condition set is “i==1000” that means this breakpoint get hit when this condition is true i.e. satisfied.

      This is very helpful when you want to stop execution of the application when certain condition met specially as in example loop having many number of element and want to stop at given location.

      Once condition set breakpoint displayed as below.


      Breakpoint changed to read icon having + sign in it. When mouse get over on breakpoint visual studio display information related to breakpoint with condition in tooltip.
    • (B).   Has changed
    • This option allows breaking execution of code at breakpoint when there is change in the variable or object.
      For Example:


      Over here variable “i” is entered in the dialog i.e. if the value of variable “i” get changed than execution of program get stopped at breakpoint.

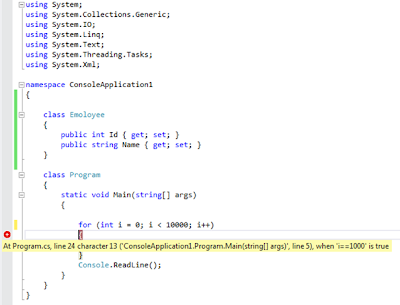
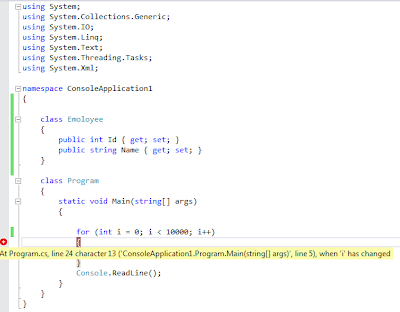
      Below image shows the tooltip on breack point once condition set.


      When this option utilize than in breakpoint context menu condition option get check as in below image.


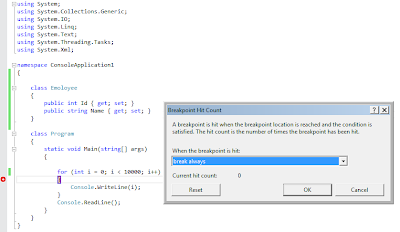
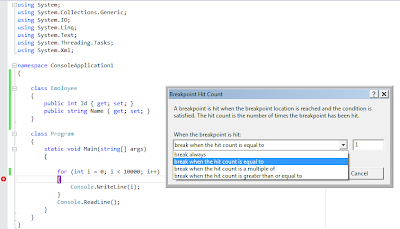
  9. Hit Count…
  10. This option display count number of time breakpoint hit when executing program.


    This dialog box has three options which allow to set hit count and if the hit count matches than program execution get stop at breakpoint. Each option is self-explanatory you can see in following image.


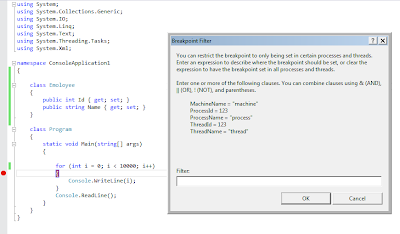
  11. Filter…
  12. This option allow to set condition related to “Machinename and Process” according to which breakpoint get hit. Following image explain more detail about it.


  13. When Hit…
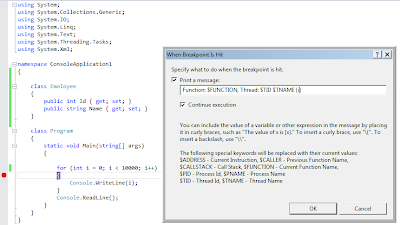
  14. This option allows setting the message than get print to output window when program executions pass the breakpoint.

    This option converts breakpoint to Tracepoint i.e. so the developer can do tracing of the import variable or things by printing message on the output window when code at trace point get executed.
    For Example:


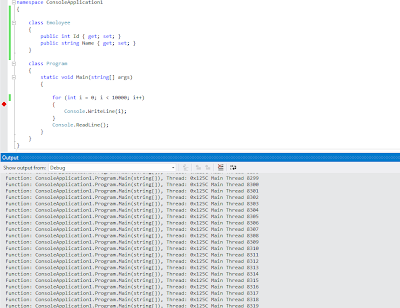
    As in above image to read value of the variable developer created message that get printed on output window each time code in for loop get executed.

    You can read the text in dialog which also provides information about how to provide information in the textbox so that it gets print to output window.

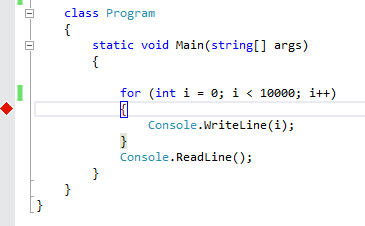
    Once developer press ok by setting the tracing message breakpoint get display like square as in below window.


    So when this program gets executed in visual studio, messages get printed to output window as shown in below image.


  15. Edit Labels…
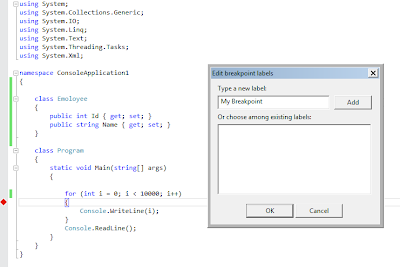
  16. This option allows setting label for your breakpoint. So it display dialog like this.


    This is helpful when developer exporting breakpoint from visual studio, help to remember how important breakpoint it via label, create of useful breakpoint by using same name etc.
  17. Export…
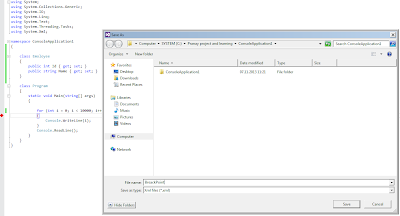
  18. This option allows exporting breakpoint set by developer.


    This exported breakpoint information get saved as “XML” as show in above image. Exported XML file for breakpoint look as below


    This option is helpful when developer want to export breakpoint and save it as XML than remove it. When there is need to same breakpoint he/she can load same breakpoint by loading XML file using Debug window of Visual studio.
BreakPoint window
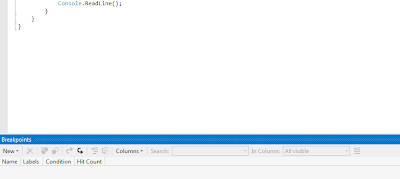
Breakpoint/tracepoint set by developer in code is get displayed by this window. This window also displays breakpoint with other information.

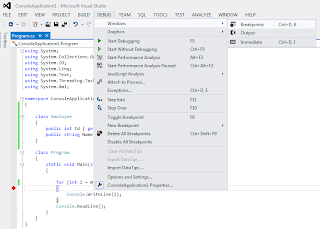
Following is way which shows how one can start breakpoint window.


So one can either use debug menu and start breakpoint window or make use of short cut Ctrl+D,B.

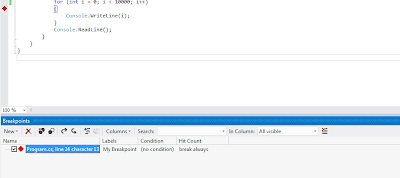
Following is image of breakpoint window.


This window also has toolbar which allows following, which is also supported by breakpoint menu discussed above.
  1. Set new breakpoint
  2. Remove breakpoint
  3. Delete all breakpoint
  4. This option allows to delete all breakpoint which is selected in breakpoint grid.
  5. Enable/Disable breakpoint
  6. Export breakpoint
  7. Import breakpoint
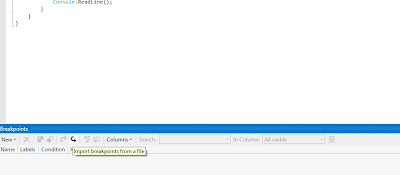
  8. This option is not part of the breakpoint menu; it is used for importing breakpoint/tracepoint.


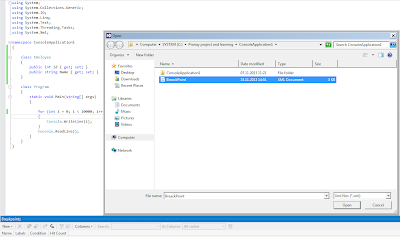
    When this button clicked by developer, visual studio open file browser window to browse xml file for breakpoint / tracepoint.


    So after loading this file breakpoint/tracepoint get set again in the code.


  9. Go to Source Code
  10. Go to Diassembly
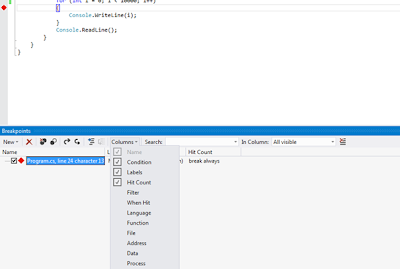
  11. Columns
  12. This tool menu allows to set number of column in the below grid i.e. in breakpoint window grid which is below toolbar.


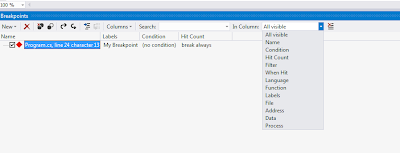
  13. Search
  14. Search allows searching breakpoint in the breakpoint grid of breakpoint window. Following is image of the same. As per the criteria specified breakpoint grid window display searched breakpoints.


Breakpoint Grid

This grid window displays all the breakpoint set by developer in source code. This grid provides information about each breakpoint according to columns set by developer in grid.


Conclusion

Breakpoints/tracepoints are very useful feature provided in visual studio, which is very usefl when you are debugging large amount of code. Visual studio provides flexibility to break execution of the code during debugging at breakpoint which is very helpful to the developer.

Thanks for reading and do post comment if you like it or something is missing or wrong.

Sunday, July 14, 2013

Generate Sequcen Diagram (Visual Studio)

Following post is about feature provided by MS Visual Studio to generate sequence diagram from already written code.

Before getting into details how the Visual Studio does the task of generated sequence diagram, Following is describe what is sequence diagram (Following description is from Wikipedia).

Sequence Diagram
A sequence diagram is a kind of interaction diagram that shows how processes operate with one another and in what order. It is a construct of a Message Sequence Chart. A sequence diagram shows object interactions arranged in time sequence. It depicts the objects and classes involved in the scenario and the sequence of messages exchanged between the objects needed to carry out the functionality of the scenario. Sequence diagrams are typically associated with use case realizations in the Logical View of the system under development.
Read more on this : http://en.wikipedia.org/wiki/Sequence_diagram

Now in the following way I designed my code and than I am going to show the sequence of this code.
View Layer

This layer of the code is View part that is going to display to the end user of the application i.e. the front end of the application.

Business Layer

This layer of the code provides business logic for the fort end part of application . This layer does all the complex activity and communicate with the datalyer.

Data Layer

This layer of the code communicate with the DataBase or DataStructure where the data is stored and bring that data out of it.

Now after doing all this For the new developer in team or to my manager I want to show the flow of code goes from front end of application and data get bring in and out of database or datastructure . Flow of the code need  to be cover following thing

  1. How the code flow from one layer to another layer
  2. Which classes are involved
  3. Which method of the classes are involved

So to achieve this Visual Studio provide feature to generate Sequence Diagram which gives answer to above questions.

Generate Sequence Diagram

To generate sequence diagram just right click on the method of the code and in context menu there is option Generate Sequence diagram as you see in image.

Generate Sequence Diagram Window
Once clicked on menu above dialog displayed to use which ask use to provide input for generating sequence diagram. Following are the some important parameter of it.
  • Maximum call depth - How much deep you want to go i.e. if there are more than one class involved in call and how much deep you want to go.   
  • Include calls in - as the options says include class and methods of project only or full solution  or full solution and external references.
  • Exclude calls to - exclude call made to property, system name space or any other namespaces. 
Generated Sequence Diagram

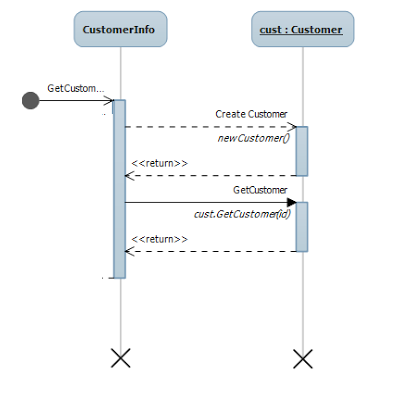
Now once clicked on the dialog generate sequence diagram as shown in above. Above sequence diagram shows the call made to GetCustomer detail to display on front end i.e. to the user of the application.
If you see the code above in images or recall the above image code is divided in three layer and three classes involved which are respectively part of each layer.
Following steps are performed to get data from the database layer displayed by sequence diagram above.
  • View layer of application i.e. Font ask for getting customer data form business layer by calling Getcustomer method, Which is static method of business class so there is no call to create object of business layer class.
  • Business layer of application receives the call to method called GetCustomer so to fill the customer details it gives call to datalayer. But before making call it crate instance of datalayer Customer class.
  • Database layer of application receives call to the method call and in turns it make call to database and retrieve data.
  • Now database layer returns this data back to business layer customer class.
  • Business layer does the process of row data return form the datalayer and return the customer object back to view layer.
  • View layer of fetch value from the object return by business layer and display it to end user
So by the mean of generating sequence diagram I will actually able to find out flow of my code between layer, classes and methods. Also this answer the all the above question.

Note :
I specified 10 in Maximum call textbox of dialog but over here only 3 level is displayed, because as discussed my layer of coding only involve three classes of three layer.

Goto code from Sequence Diagram


With the help of generated sequence diagram by visual studio I can also jump to specify method of code directly by double clicking on the message or method call.
For example I clicked on new Customer create message or method call i.e. on the method call which marked red in above image.

Code on double click from sequence diagram

So after double clicking on the method call it directly redirect me to the code part form the generated sequence diagram. 

Advantage of the Generating Sequence diagram
  • Biggest advantage of this is its helps to understand code build by some one else i.e. if you are involved in development of the project and code build by some other developer who is not part of your team and you want to find the flow of the code from start point to end point.
  • It also help you to explain code build by you and you want to explain to the other developer joining your team.
  • It displays the all classes and method called in code. 
Note :
This feature generates sequence diagram from the method you clicked till end, but it doesn't display the method called before the method you selected.
For example
If I clicked on the method of business layer of my project to generate sequence diagram and it generates sequence diagram from that method i.e. from the business layer and database layer. It doesn't display those method which given call to the method on which I clicked, that means I am not able to get information from which Font end method this method is get called.
So when generated sequence diagram by clicking on the business layer method of the code discussed above, it generate sequence diagram display above. As discussed it doesn't display method of view layer which called business layer method.  

Conclusion
So this cool feature of visual studio very helpful when you want to explain your own code or you want to understand code.

Thanks for reading and do post comment if you like it or something is missing or wrong.

Ref by : http://msdn.microsoft.com/en-us/library/vstudio/ee317485.aspx 

Saturday, March 16, 2013

Store data locally with HTML5 Web Storage

Now new version of HTML5 having number of new API one of the is Storage API, which allow you to store data of use locally. Here in following post I am going to describe Storage API.

Cookies vs. Storage
In previous version of HTML allows to store data locally with the help of Cookies but the
  •  issue with the cookies is its not allow to big object and which can be easily done. Storage allows 5M (most browsers) or 10M (IE) of memory at disposal. 
  • Another problem is cookies get sent to server with each HTTP request which in term increases traffic.
Storage
Now lets start using the store in application
if(typeof(Storage)!=="undefined")
{
  alert("storage is supported and you can store data in it"); 
}
else
{
 alert("Get new version of browser or use browser which support storage");
}
So here in above as you can see, first line of code check weather browser supports/have Storage object. It's good to check because most of the older browser is not supporting and as its new feature its mostly supported in new browsers.

After doing check for Storage support decide either you want to store data for given session only or want to store data which available even after session is over and when user come back.
So there are two type of object which is explained below
  • sessionStorage is used to store within the browser tab or window session. so it allows to store data in a single web page session.
  • localStorage is used to kept even between browser sessions. so it allows to access data after the browser is closed and reopened again, and also instantly between tabs and windows.
Note : Storage data created by one browser is not avaible in other browser. for example created in IE is not available in FireFox.

Following is the way you can use the localStorage and sessionStorage in your application.
//sessionStorage 
//set and get object 
sessionStorage.setItem('myKey', 'myValue');
var myVar = sessionStorage.getItem('myKey');
//another way to set and get 
sessionStorage.myKey = 'myValue';
var myVar = sessionStorage.myKey;

//remove item
sessionStorage.removeItem('myKey');

//clear storage 
sessionStorage.clear();
//localStorage 
//set and get object 
localStorage.setItem('myKey', 'myValue');
var myVar = localStorage.getItem('myKey');
//another way to set and get 
localStorage.myKey = 'myValue';
var myVar = localStorage.myKey;

//remove item
localStorage.removeItem('myKey');

//clear storage 
localStorage.clear();
as in the above code both of the object support same set of methods to store and retrieve data.
  • setItem - allows to set value. 
  • getItem - allows to get value.
  • removeItem - allows to remove object from storage. Note: if it used like removeItem(), it removes all stored object , so be careful when removing -to remove specific object use removeItem("myKey"). 
  • clear - clear storage i.e. clear all stored data.
and as you can see storage store data in key value pair.

Conclusion
Web Storage simplify the storing of object in client and also have advantage over cookies, but its always good to not store sensitive information in the client side storage as storage is not provide that much security.

Thanks for reading and do post comment if you like it or something is missing or wrong.

Thursday, March 14, 2013

Object to XML using LINQ or XmlSerializer

In Following post I am going show you how easily you can convert you object in the XML string, because sometime there is need of pass object and XML from one function to another and also convert XML string back to object. But As title suggest here I just going to discuss the conversion of object to XML string.

Following two way to achieve this task of converting Object to XML.

Before we start Below is class structure which object need to be convert in XML string.
public class Product
    {
        public string Name { get; set; }
        public int Code { get; set; }
        public List<productType> types {get; set;}
    }

    public class productType
    {
        public string type {get; set;}
    }
As you can see in structure Product is class and it's having list of producttype in it.

Way 1 : Linq To XML
 List<productType> typ = new List<productType>();
            typ.Add((new productType() { type="Type1"}));
            typ.Add((new productType() { type = "Type2" }));
            typ.Add((new productType() { type = "Type3" }));

            Product[] products = { new Product { Name = "apple", Code = 9,types=typ }, 
                       new Product { Name = "orange", Code = 4,types=typ   }, 
                       new Product { Name = "apple", Code = 9 ,types=typ}, 
                       new Product { Name = "lemon", Code = 9,types=typ } };
Above code is creating array of product which contains the object of product. Over all its initializing the product array object.Now to convert this in the XML using Linq following is code
            XElement _customers = new XElement("Products",
                       from c in products
                       orderby c.Code 
                        select new XElement("product",
                            new XElement("Code", c.Code),
                            new XElement("Name", c.Name),
                            new XElement("Types", (from x in c.types
                                                  orderby x.type//descending 
                            select new XElement("Type",x.type)) 
                        ))
                  );

            Console.WriteLine(_customers.ToString());
As you see in above code its converting the each property of object in XMLElement by using method of Linq To XML which is XElement. You can modify structure as per you needs here is more on Linq to XML

Output


Way 2 : Make use of XmlSerializer
You can easily convert the object in XML string by using Serializer as shown below. This process called as object serialization.
            XmlSerializer xser = new XmlSerializer(products.GetType());
            xser.Serialize(Console.Out, products);
            Console.ReadLine();
As you see there just two line of code need to conversion. There is no need to write more amount of the code like Linq To XML, But if you want to control structure of the generated XML you need to decorate your class with XmlAttributes. Read more about this XmlSerializer

Output


Comparison between both the ways
  • Big difference between both is way XML string is generated. That you can easily figure out form the Output of both the way.
  • XmlSerializer provide more control on XML than than the Lin To XML.
  • As stated with Linq to Xml you need to write down more amount of code to structure the XML string which is very easy with XmlSerializer. But if you dont want the default structure generated by XmlSerializer you need to use XmlAttributes for each property. with attribute class will be

 public class Product
    {
        [XmlElement("Product Name")]
        public string Name { get; set; }
        [XmlElement("Code")]
        public int Code { get; set; }
        [XmlElement("Types")]
        public List types {get; set;}
    }
But you can easily do this in Linq to XML.
  •  When you dont want to include some property in XML string. you just need to skip that property like this.
XElement _customers = new XElement("Products",
                       from c in products
                       orderby c.Code //descending 
                        select new XElement("product",
                            //new XElement("Code", c.Code),
                            new XElement("Name", c.Name),
                            new XElement("Types", (from x in c.types
                                                  orderby x.type//descending 
                            select new XElement("Type",x.type)) 
                        ))
                  );
in linq to xml you just need to remove it here i just commented Code so there is no element for Code.


For XmlSerializer you need to put attribute called [Obsolete] on top of property.
        public string Name { get; set; }
        [Obsolete]
        public int Code { get; set; }
        public List types {get; set;}

  • Another Difference is Linq TO XML is faster than XmlSerializer which you can easy see by running the code its because XmlSerializer is Serializing object which might be using reflection and other metadata information about the object.
Conclusion
You can use one of the way as per your need. But if you just want to generate XML than its better to go for Linq to XML and if there is serialization/ de-serialization required than go for XmlSerializer .

Provide comments if you find more difference and there is thing change require in above. Thanks for reading.

Monday, January 28, 2013

CSS Selector

In this post is about CSS selector and how it woks. Following is explanation of most of the selector that is used in CSS.

In the following first is css example and than html code on which it will work, so to try by yourself create html page and put the css as well as related Html and see the result. In most of the select I provided demo link where you can visit and see the result.

In below post you might find some new CSS selector that are the part of new CSS3. All of the below examples and demo tried by me on latest Chrome version.

.Class -: Select all the element with given class name.
CSS
.MyIntro
{
  font:15px arial,sans-serif;
  color:red;
}
Use
<div class="MyIntro">
<p>My name is Pranay Rana.</p>
<p>I am working as Soft Engg.</p>
</div>

#id -: Select all the element with given id name.
CSS
 #MyIntro
{
  font:15px arial,sans-serif;
  color:red;
}
Use
<div id="MyIntro">
<p>My name is Pranay Rana.</p>
<p>I am working as Soft Engg.</p>
</div>
Point to Note : You can have more than one element having same classname in HTML page but you can have only one element with the ID.

HTMLElement - Select all the html element which name is given.
CSS
 p
{
  font:15px arial,sans-serif;
  color:red;
}
Use
<div>
<p>My name is Pranay Rana.</p>
<p>I am working as Soft Engg.</p>
</div>

HtmlElement HtmlElemnt - Select all the html element which are in html element.
CSS
div p
{
  font:15px arial,sans-serif;
  color:red;
}
Use
<div >
<p>My name is Pranay Rana.</p>
<Span>
 <p> data </p>
</Span>
</div>
<p>I am working as Soft Engg.</p>
in this example all p element inside div get highlighted with read color, but p element outside div doesnt get affected.

Demo 


HtmlElement > HtmlElemnt - Select all the html element which are child of html element.
CSS
div > p
{
  font:15px arial,sans-serif;
  color:red;
}
Use
<div >
<p>My name is Pranay Rana.</p>
<Span>
 <p> data </p>
</Span>
</div>
<p>I am working as Soft Engg.</p>
in this example all p element which are child of div get highlighted with read color, but p element which are not child of div doesnt get affected.

Demo 


HtmlElement + HtmlElemnt - Select all the html element which are immediate after html element.
CSS
div + p
{
  font:15px arial,sans-serif;
  color:red;
}
Use
<div >
<p>My name is Pranay Rana.</p>
</div>
<p>I am working as Soft Engg.</p>
<p> data </p>
in this example p element which is immediate after div get highlighted with read color, in this example "I am working as Soft Engg." this text get highlighted.

Demo


HtmlElement ~ HtmlElemnt - Select all the html element which are precedes html element.
CSS
div ~ p
{
  font:15px arial,sans-serif;
  color:red;
}
Use
<div >
<p>My name is Pranay Rana.</p>
    <span>
        <p> data </p>
  </span> 
</div>
<p>I am working as Soft Engg.</p>
<p>My Demo Page.</p>
in this example p element which is precedes div get highlighted  with read color, in this example "I am working as Soft Engg." and "My Demo Page." text get highlighted.

Demo


[attribute] - Select all the html element which is having attribute.
CSS
[data-name]
{
  font:15px arial,sans-serif;
  color:red;
}
Use
<div >
<p data-name="pranay">My name is Pranay Rana.</p>
    <span>
        <p> data </p>
  </span> 
</div>
<p>I am working as Soft Engg.</p>
<p data-name="demo">My Demo Page.</p>
in this example any element which is having attribute "data-name"div get highlighted with red color, in this example "My name is Pranay Rana." and "My Demo Page." text get highlighted.

Demo


[attribute = data] - Select all the html element which is having attribute value equal to data.
CSS
[data-name = 'demo']
{
  font:15px arial,sans-serif;
  color:red;
}
Use
<div >
<p data-name="pranay">My name is Pranay Rana.</p>
    <span>
        <p> data </p>
  </span> 
</div>
<p>I am working as Soft Engg.</p>
<p data-name="demo">My Demo Page.</p>
in this example any element which is having attribute "data-name" and value = "demo" get highlighted  with red color, in this example "My Demo Page." text get highlighted.

Demo


[attribute ^= data] - Select all the html element where attribute value begins with data.
CSS
[data-name ^= 'pra']
{
  font:15px arial,sans-serif;
  color:red;
}
So with the above html when apply this "My name is Pranay Rana."  text is get highlighted because its "data-name" attribute value begining with "pra".

Demo


[attribute $= data] - Select all the html element where attribute value end with data.
CSS
[data-name ^= 'pra']
{
  font:15px arial,sans-serif;
  color:red;
}
So with the above html when apply this "My name is Pranay Rana."  text is get highlighted because its "data-name" attribute value ending with "nay".

Demo


[attribute *= data] - Select all the html element where attribute value contains data.
CSS
[data-name *= 'rana']
{
  font:15px arial,sans-serif;
  color:red;
}
So with the above html when apply this "My name is Pranay Rana."  text is get highlighted because its "data-name" attribute value contains "rana".

Demo


[attribute ~= data] - Select all the html element where attribute value contains word data.
CSS
[data-name ~= 'page']
{
  font:15px arial,sans-serif;
  color:red;
}
Use
<div >
<p data-name="pranay_page">My name is Pranay Rana.</p>
    <span>
        <p> data </p>
  </span> 
</div>
<p>I am working as Soft Engg.</p>
<p data-name="demo page">My Demo Page.</p>
in this example any element where attribute "data-name"  value contains word = "page" get highlighted  with red color, in this example "My Demo Page." text get highlighted

Demo


:first-child - Select first element (first child) of parent.
CSS
li:forst-child
{
  font:15px arial,sans-serif;
  color:red;
}
Use
<ul>
    <li>item1</li>
    <li>item2</li>
    <li>item3</li>
    <li>item4</li>
</ul>
in this example "item1" element get highlighted  with red color.

Demo


:last-child - Select last element (last child) of parent.
CSS
li:last-child
{
  font:15px arial,sans-serif;
  color:red;
}
Use
<ul>
    <li>item1</li>
    <li>item2</li>
    <li>item3</li>
    <li>item4</li>
</ul>
in this example "item4" element get highlighted  with red color.

Demo


:nth-child(n) - Select all each element which n the child of parent.
CSS
li:nth-child(2)
{
  font:15px arial,sans-serif;
  color:red;
}
Use
<ul>
    <li>item1</li>
    <li>item2</li>
    <li>item3</li>
    <li>item4</li>
</ul>
in this example "second li" element get highlighted  with red color, in this example "item2" text get highlighted

Demo


:nth-child(n) - Select all each element which last n the child of parent counting from bottom .
CSS
li:nth-child(2)
{
  font:15px arial,sans-serif;
  color:red;
}
Use
<ul>
    <li>item1</li>
    <li>item2</li>
    <li>item3</li>
    <li>item4</li>
</ul>
in this example "second last li" element get highlighted  with red color, in this example "item3" text get highlighted

Demo


:only-child - Select child element which only child of parent .
CSS
p:only-child
{
  font:15px arial,sans-serif;
  color:red;
}
Use
<div>
    <p> pragraph 1</p>
</div> 
<div>
    <p> pragraph 2</p>
    <p> pragraph 3</p>
    <p> pragraph 4</p>
</div>
in this example "paraghaph 1" element get highlighted  with red color,which is only child of div element.

Demo


:first-of-type - Select first element of given type which is first comes under parent element.
CSS
p:first-of-type
{
  font:15px arial,sans-serif;
  color:red;
}
Use
<div>
    <p> pragraph 1</p>
    <p> pragraph 2</p>
    <p> pragraph 3</p>
</div>
in this example "paragraph 1" element get highlighted  with red color.

Demo


:last-of-type - Select last element of given type which is last comes under parent element.
CSS
p:last-of-type
{
  font:15px arial,sans-serif;
  color:red;
}
Use
<div>
    <p> pragraph 1</p>
    <p> pragraph 2</p>
    <p> pragraph 3</p>
</div>
in this example "paragraph 1" element get highlighted  with red color, that means here "pragraph 1" is first element of type p under div.

Demo


:nth-of-type(n) - Select nth element of given type which comes at nth place under parent element.
CSS
p:nth-of-type(2)
{
  font:15px arial,sans-serif;
  color:red;
}
Use
<div>
    <p> pragraph 1</p>
    <p> pragraph 2</p>
    <p> pragraph 3</p>
    <p> pragraph 4</p>
</div>  
in this example "paragraph 2" element get highlighted  with red color, that means here "pragraph 2" is 2th element of type p under div.

Demo


:nth-last-of-type(n) - Select nth last element of given type which comes at nth place under parent element from last.
CSS
p:nth-last-of-type(2)
{
  font:15px arial,sans-serif;
  color:red;
}
Use
<div>
    <p> pragraph 1</p>
    <p> pragraph 2</p>
    <p> pragraph 3</p>
    <p> pragraph 4</p>
</div>  
in this example "paragraph 3" element get highlighted  with red color, that means here "pragraph 3" is last element of type p under div from last.

Demo


:only-of-type - Select only element of given type which comes under parent element.
CSS
p:only-of-type
{
  font:15px arial,sans-serif;
  color:red;
}
Use
<div>
    <p> pragraph 1</p>
</div> 
<div>
    <p> pragraph 2</p>
    <p> pragraph 3</p>
    <p> pragraph 4</p>
</div>  
in this example "paragraph 1" element get highlighted  with red color, because p is only element of given type.

Demo


:empty - Select element which is empty i.e. donent have any child.
CSS
div:empty
{
  width:100px;
height:20px;
background:red;
}
Use
<div></div> 
<div>
    <p> pragraph 2</p>
    <p> pragraph 3</p>
    <p> pragraph 4</p>
</div>  
in this highlight all text in the document with red color.

Demo


::selection - highlight the text with the color selected.
CSS
::selection
{
  background:green;
}
Use
<div> <p> pragraph 1</p> </div> 
   <div>
    <p> pragraph 2</p>
    <p> pragraph 3</p>
    <p> pragraph 4</p>
</div>    
in this highlight all text with green which get select in document.

Demo


:not(HTMLElement) - it not apply the style to the HTMLElement specified.
CSS
:not(span)
{
  font:15px arial,sans-serif;
  color:red;
}
span
{
  color:black;
}
Use
 <p> pragraph 1</p>
 <p> pragraph 2</p>
 <p> pragraph 3</p>
 <p> pragraph 4</p>
 <span> span data</span>    
in this highlight all text which is in p element i.e. not apply style to span element.

Demo


:enable - select to all enable element.
:disable - select to all disable element.
CSS
:input[type="text"]:enabled
{
background:green;
}
input[type="text"]:disabled
{
background:red;
}
Use
Name: <input type="text" value="Pranay Rana" /><br>
Country: <input type="text" disabled="disabled" value="India" />    
here name is get highlighted with red color and country box is get highlighted with green.

Demo


Conclusion
Most of the selector are new here those are part of CSS3, I hope that helpful to understand well. I covered most of the CSS selector here but if there is something missing please place comment below regarding it.

Leave comment if you have any query or if you like it.  Pelease report if any link is not working or broken.

Friday, January 25, 2013

DistinctBy in Linq (Find Distinct object by Property)

In this post I am going to discuss about how to get distinct object using property of it from collection. Here I am going to show three different way to achieve it easily.
In this post I am going to discuss about extension method that can do task more than the current Distinct method available in .Net framework.

Distinct method of Linq works as following right now.
public class Product
{
    public string Name { get; set; }
    public int Code { get; set; }
}
Consider that we have product Class which is having Code and Name as property in it.
Now Requirement is I have to find out the all product with distinct Code values.
Product[] products = { new Product { Name = "apple", Code = 9 }, 
                       new Product { Name = "orange", Code = 4 }, 
                       new Product { Name = "apple", Code = 10 }, 
                       new Product { Name = "lemon", Code = 9 } };
var lstDistProduct = products.Distinct();
foreach (Product p in list1)
{
     Console.WriteLine(p.Code + " : " + p.Name);
}
Output

It returns all the product event though two product have same Code value. So this doesn't meet requirement of getting object with distinct Code value.

Way 1 : Make use of MoreLinq Library
First way to achieve the requirement is make use of MoreLinq Library, which support function called DistinctBy in which you can specify the property on which you want to find Distinct objects.
Below code is shows the use of the function.
var list1 = products.DistinctBy(x=> x.Code);

foreach (Product p in list1)
{
     Console.WriteLine(p.Code + " : " + p.Name);
}
Output

As  you can see in output there is only two object get return which actually I want. i.e. distinct value by Code or product.
If you want to pass more than on property than you can just do like this  var list1 = products.DistinctBy(a => new { a.Name, a.Code });
You can read about the MoreLinq and Download this DLL from here : http://code.google.com/p/morelinq/ one more thing about this library also contains number of other function that you can check.

Way 2: Implement Comparable
Second way to achieve the same functionality is make use of overload Distinct function which support to have comparator as argument.
here is MSDN documentation on this : Enumerable.Distinct<TSource> Method (IEnumerable<TSource>, IEqualityComparer<TSource>)

So for that I implemented IEqualityComparer and created new ProductComparare which you can see in below code.
   
    class ProductComparare : IEqualityComparer
    {
        private Func<Product, object> _funcDistinct;
        public ProductComparare(Func<Product, object> funcDistinct)
        {
            this._funcDistinct = funcDistinct;
        }

        public bool Equals(Product x, Product y)
        {
            return _funcDistinct(x).Equals(_funcDistinct(y));
        }

        public int GetHashCode(Product obj)
        {
            return this._funcDistinct(obj).GetHashCode();
        }
    }
So In ProductComparare constructor I am passing function as argument, so when I create any object of it I have to pass my project function as argument.
In Equal method I am comparing object which are returned by my projection function.
Now following is the way how I used this Comparare implementation to satisfy my requirement.
var list2 = products.Distinct(new ProductComparare( a => a.Code ));

            foreach (Product p in list2)
            {
                Console.WriteLine(p.Code + " : " + p.Name);
            }
Output

So this approach also satisfy my requirement easily. I not looked in code of MoreLinq library but I think its also doing like this only. If you want to pass more than on property than you can just do like this  var list1 = products.Distinct(a => new { a.Name, a.Code });.

Way 3: Easy GroupBy wa
The third and most eaisest way to avoide this I did in above like using MoreLine and Comparare implementation is just make use of GroupBy like as below
 List<Product> list = products
                   .GroupBy(a => a.Code )
                   .Select(g => g.First())
                   .ToList();

            foreach (Product p in list)
            {
                Console.WriteLine(p.Code + " : " + p.Name);
            }
In above code I am doing grouping object on basis of property and than in Select function just selecting fist one of the each group will doing work for me.
Output

So this approach also satisfy my requirement easily and output is similar to above two approach. If you want to pass more than on property than you can just do like this   .GroupBy(a => new { a.Name, a.Code }).

So this one is very easy trick to achieve the functionality that I want without using any thing extra in my code.

Conclusion
So Above is the way you can achieve Distinct of collection easily by property of object.

Leave comment if you have any query or if you like it.

Wednesday, January 23, 2013

GeoLocation API in HTML5

HTML5 have cool feature that is provide gelocation of the user on the fly without using any extra services that we do right now. This feature is supported by Gelocation API which is part of HTML5.

Following is sample Code in JavaScript how it works.
<button onclick="getGeoLocation()">Get GeoLocation</button>
<script>
  function getGeoLocation()
  {
    if (navigator.geolocation)
    {
      navigator.geolocation.getCurrentPosition(showPosition,HandleError);
    }
    else
    {
      alert("Geolocation is not supported by this browser.");
    }
  }
  function showPosition(position)
  {
      alert("Latitude: " + position.coords.latitude + 
               "    Longitude: " + position.coords.longitude); 
  }
</script>
Code is work in this pattern.
  1. First when user click on button it calls getGeoLocation
  2. In that function its first check navigator.geolocation supported or not.
  3. It calls Inbuilt JavaScript method getCurrentPosition which returns Postion object
  4. This Position object used by showPostion to display Latitude and Logitude 

Below is handleError function that used to handle any error which might occur while accessing GeoLocation of the user.
  function HandleError(error)
  {
    switch(error.code) 
    {
     case error.PERMISSION_DENIED:
      alert("User denied the request for Geolocation.");
      break;
     case error.POSITION_UNAVAILABLE:
      alert("Location information is unavailable.");
      break;
     case error.TIMEOUT:
      alert("The request to get user location timed out.");
      break;
     case error.UNKNOWN_ERROR:
      alert("An unknown error occurred.");
      break;
    }
  }
Code of the function is self-explained by the values given.

Update GeoLocation as you Move with watchPosition
There is one of function which is part of Gelocation API that is very useful to get continues update of location as user moves from one place to another palce.
watchPosition - function that is used to achieve the above function.
To see how this works actually just replace getCurrentPosition function with watchPosition.
To stop updates from watchPosition you can use clearWatch() of API.

Position Object
Both method returns Postion object as output. Following is list of property that is part of Position Object.

coords.latitudeThe latitude as a decimal number
coords.longitudeThe longitude as a decimal number
coords.accuracyThe accuracy of position
coords.altitudeThe altitude in meters above the mean sea level
coords.altitudeAccuracyThe altitude accuracy of position
coords.headingThe heading as degrees clockwise from North
coords.speedThe speed in meters per second
timestampThe date/time of the response
Leave comment if you have any query or if you like it.

Tuesday, January 22, 2013

Index of Collection Using Linq

This is small post regarding How to get the index of each element in collection. There are sometime requirement to bind list of element with the dropdwon or list control with index as value and Data as Text value in this case you need to get index for each element.

Following is piece of code that make use of Linq and get the indexes for each element in collection.

//example of getting index of List Element
List<string> ListItems = 
       new List<string> { "Test1", "Test2", "Test3", "Test4" };
var ListWithIndex= someItems.Select((item, index) => new
{
      ItemName = item,
      Position = index
});

//example of getting index of Array Element
string[] ArryItem= { "Item1", "Item2", "Item3", "Item4" };
var ArraywithInex= someItems.Select((item, index) => new
{
      ItemName = item,
      Position = index
});
As you see in code there is one lambda function passed in the Select function of linq, and another point to note down is each elemtn has index associated with it. So by applying function like above in linq its easy to get the index of element.

Friday, January 4, 2013

Display and Format Negative Currency value

This small tip about how to show the negative currency value in your application. For Example if you have currency value like -1234 and you want to display it like -$1,234 according to you culture.

Problem
In C# to one of the way to format currency value easily is use ToString("c") with value will do work for you. For example check below code
//format -1234 as currency..
Console.WriteLine((-1234).ToString("c"));

Output
This will display value in output like this ($1,234.00). But the actual problem with the formatting is its not displaying - sign with currency value.

Solution
So to come out of this You need to create a custom NumberFormatInfo from your current locale. Then you can specify it's CurrencyNegativePattern, for example:
CultureInfo currentCulture = Thread.CurrentThread.CurrentCulture;
CultureInfo newCulture = new CultureInfo(currentCulture.Name);
newCulture.NumberFormat.CurrencyNegativePattern = 1;
Thread.CurrentThread.CurrentCulture = newCulture;
Console.WriteLine((-1234).ToString("c"));

Output
Now output of the above code is -$1,234.00. That's what actually needed display negative sign for negative currency value.
So in above code actual trick done by NumberFormatInfo.CurrencyNegativePattern Property, which is set to 1 which associated with pattern -$n. There number of different pattern supported which you can check on MSDN and assign value to property according to your need. This will not affect positive value of currency i.e. if you pas 1234 as value its dispaly as $1,234 only. And for this this example my current culture is "en-US" .

Conclusion
I Hope you all like this simple and easy example of formatting negative currency. you can explore more on MSDN on reference provided at end of post.
NumberFormatInfo Classhttp://msdn.microsoft.com/en-us/library/system.globalization.numberformatinfo.aspx
NumberFormatInfo.CurrencyNegativePattern Property - http://msdn.microsoft.com/en-us/library/system.globalization.numberformatinfo.currencynegativepattern.aspx

Leave comment if you have any query or if you like it.