Pranay Rana: March 2018

Saturday, March 31, 2018

Angular Custom Validation Component

Full Source at GitHub : AdvCustomValidationComponent

Validation is very important feature of application which allows to data entry (allows to enter data in application) as invalid data can leave application in inconsistent state, invalid date entry crash application and if data is not validated it can allows injection attacks on application. In Web application validation can be done at server side (i.e. on server like IIS, apache in language C#, PHP etc.) and at client side (i.e in browser windows using javascript).

Here, following post is about validation in Angular 2 application , which means its about validation on client side not about server side. Angular framework allows to do validation following two way
  1. Template Driven Form
  2. Reactive Form
One of this approach or mix of both approach can be used in application for validation. Not going to discuss about it as it provided in detail over here : Forms & Validation. But following post is going to discuss about custom component, which works with both the validation approach provide by angular 2 framework and encapsulate validation code in it.

Custom Validation Component
Let's first create validation component and make use of it in application. For fresh start of application follow this post : My first Angular 2 app - tutorial. After creating application create shared module in application by running below command in integrated terminal of visual studio code.
 ng g module shared.

Shared module is where custom validation component will resides , as custom validation component is dumb and its going to be used by multiple features in application. Run command on integrated terminal create
 ng g component shared/custom-input 
custom validation component.

custom-input.component.html
 <div class="form-group" >
  <label class="control-label">{{label}}</label>
  <br />
  <div [ngClass]="{'has-error':isError}" >
    <ng-content></ng-content>
    <ng-container *ngIf='isError'>
      <span class="text-danger" *ngFor="let msg of errorMessages"> {{msg}}</span>
    </ng-container>
  </div>
</div> 

Above is modification done in component html, some of the points to note in html are
  1. ng-content - which is very important tag in this html and important for validation component. This Angular 2 Framework tag allows to push any content in html when component loaded. For example:
    <custom-input>
      <input inputRef class="form-control" type="text" />
    </custom-input> 
    when above code written in component it will become like this,

    so input element put inside in ng-conent when component loaded in html page.
  2. inputRef its directive associated with input element, that intrun allows to access input element in comoponent typescript (more discussed below). 
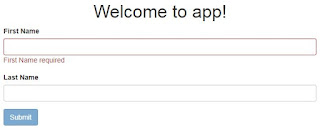
  3. When custom component render in browser it look as below:

    So, html tags in component will create structure above as shown in below image 

    image above explain all the tags which made up component template. Just to note few points
    1. Border around the text box controls comes when text box becomes invalid. Border to textbox get applied by 'has-error' class , which get applied isError becomes true (in which case it becomes true described by code in typescript file below),
    2. "First Name Required"- this message comes when there is error i.e. in this image it error related to required validation. This passed as input to component described below
    3. label,(First Name) - will come from typescript associated with component template. This passed as input to component described below.
custom-input.component.ts
@Component({
  selector: 'custom-input',
  templateUrl: './custom-input.component.html',
  styleUrls: ['./custom-input.component.css']
})
export class CustomInputComponent implements OnInit {
  @Input() label: string;
  @Input() validations:  { [index: string]: string};
  @Input() info: string;

  @ContentChild(InputRefDirective) input: InputRefDirective;

  get isError() {
    return this.input.hasError;
  }

   get errorMessages() {
    const errors = this.input.errors;
    const messages = [];
    const keys = Object.keys(this.validations);

    keys.forEach(key => {
        if (errors[key]) {
          messages.push(this.validations[key]);
        }
      });
    return messages;
  }

  ngOnInit() { }

  constructor() { }
} 

Above is Component Typescript file , code in file handles all the backend logic to control Component invalid/valid state, putting red border around control when there is error and displaying error message when control is in invalid state.

Type Name Description
Input


label display label text for control E.x. First Name in above image

validations its indexed object hold validations associated with input tag of component
E.x. {'required' : 'First Name required', 'minlength': 'Minimum lenght is 3 char'}
Note: indexed property name must need to match with type of validation E.x. 'required' key match with required validation 

info
variable


input this component variable allows to get access to input control (which replaces ng-content in template of component) associated with component, for example above image in this case 'input textbox'.
Properties


isError component property which  find input element (with help of input directive) and get element has error or not, which in turn helps to put red border around input control

errorMessages component property which access errors associated input element (with help of input directive) and with help of input property validations object find proper error messages and return to display all. 

Important thing to not here is InputRefDirective , which access input control. Below is code for input-ref directive.

input-ref.directive.ts ( created by ng g directive directive/InputRef )
import { Directive } from '@angular/core';
import { NgControl } from '@angular/forms';

@Directive({
  selector: '[inputRef]'
})
export class InputRefDirective {

  constructor(private formControl: NgControl) {
  }

  get hasError() {
    return this.formControl.dirty && this.formControl.invalid;
  }

  get errors() {
    if (this.hasError && this.formControl.errors) {
      return this.formControl.errors;
    }
    return '';
  }
}

Important part of input-ref directive is, with help of constructor injection (by using angular framework injection) NgControl get injected in the input-ref directive. By doing that directive class get access to input control.

Type Name Description
Properties


hasError property return true (when control is dirty and invalid state) or flase , to indicate there is error or not

errors property returns list of errors associated with input control

So its end of creation of validation component and its related directive. Now let's see how to use it in application.

app.component.html
Reactive Form
<form class="needs-validation" [formGroup]="detailForm" novalidate>
    <custom-input [label]="'First Name'" [validations]="{required:'First Name required'}">
      <input inputRef class="form-control" formControlName="firstName" type="text" />
    </custom-input>
    <custom-input [label]="'Last Name'" [validations]="{required:'Last Name required'}">
      <input inputRef class="form-control" formControlName="lastName" type="text" />
    </custom-input>
    <div>
      <button [disabled]="detailForm.invalid" type="button" class="btn btn-primary">Primary</button>
    </div>
</form>

Component.ts for Reactive form only 
code below create form reactive way - point to note here no much code to access control and display error (discussed below in advantages).
export class AppComponent implements OnInit {
  title = 'app';
  detailForm: FormGroup;

  constructor(private fb: FormBuilder) {
    this.createForm();
  }

  ngOnInit() {
  }

  private createForm() {
    this.detailForm = this.fb.group({
      firstName: new FormControl('', [Validators.required]),
      lastName: new FormControl('', [Validators.required]),
    });
  }
}

Template Driven Form
<form class="needs-validation" #detailForm="ngForm" novalidate>
    <custom-input [label]="'First Name'" [validations]="{required:'First Name required'}">
      <input inputRef class="form-control" [(ngModel)]="firstName" name="firstName" type="text" />
    </custom-input>
    <custom-input [label]="'Last Name'" [validations]="{required:'Last Name required'}">
      <input inputRef class="form-control" [(ngModel)]="lastName" name="lastName" type="text" />
    </custom-input>
    <div>
      <button [disabled]="detailForm.invalid" type="button" class="btn btn-primary">Primary</button>
    </div>
</form>

It's not full template of application component code, but it part of template which uses Custom validation  component in both ways Reactive Form and Template Driven Form way. So not much change in both way, except change forced by reactive form approach and template driven form approach.

Not much in app.component template to discuss as already discussed before in post. app.component template make use of custom validation component and pass all required input values (label, info and validation error).

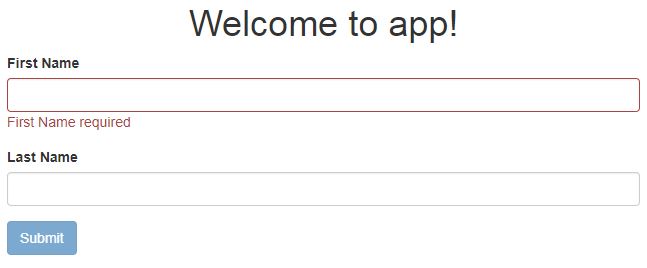
Below is image of final form after doing all changes


Advantage of using Custom validation component

  1. Less code in component template,
    Template driven from
     <label class="control-label">First Name</label>
      <input
      type="text"
      name="firstName"
      [(ngModel)]="firstName"
      minlength="2"
      required>
    
    <div *ngIf="firstName.errors?.required && firstName.touched && firstName.touched" 
    class="label label-danger">
      Name is required
    </div>
    <div *ngIf="firstName.errors?.minlength && firstName.touched && firstName.touched" 
    class="label label-danger">
      Minimum of 2 characters
    </div>

    Reactive from
     component.ts
    
     this.detailForm = this.form.group({
           firstName: [null, Validators.compose([Validators.required, Validators.minLength(2)])],     
        });
    
    component.html
    <label class="control-label">First Name</label>
    <inpu.
      type="text"
      name="firstName"
      [(ngModel)]="firstName"
      minlength="2"
      required>
    
    <div *ngIf="detailForm.get('firstName').errors?.required && detailForm.get('firstName').touched && detailForm.get('firstName').touched" 
    class="label label-danger">
      Name is required
    </div>
    <div *ngIf="detailForm.get('firstName').errors?.minlength && detailForm.get('firstName').touched && detailForm.get('firstName').touched" 
    class="label label-danger">
      Minimum of 2 characters
    </div>  

    If there is no custom validation component , in both the way (Template driven or Reactive way) one need to write down separate div for displaying each error input control has, for example (div for required error and div for minlength).
    But with custom validation control, there just need of passing validations in validations-property of control and it will take care of it.
        <custom-input [label]="'First Name'" 
                   [validations]="{required:'First Name required', 'minlength':'Minimum of 2 characters'}">
          <input inputRef class="form-control" [(ngModel)]="firstName" name="firstName" type="text" />
        </custom-input>
    

    Event there is no need to write extra label tag for displaying label for input control. This also taken care by custom validation control label-property.
  2. Second major difference is, custom validation control encapsulate code of validation in one place only for full application. That means there is no need to write validation code in template in each and every data entry form.

Wrapping up
Custom validation control is easy and simple to use. It makes use of some advance stuff like ng-content, directive to get input control under the hood and encapsulate thing in it. Once control included in application it reduce amount of validation code & effort to write validation code in every data entry form.
Full Source at GitHub : AdvCustomValidationComponent

Sunday, March 25, 2018

My first Angular 2 app - tutorial

There are lof of developer now days started learning and devloping websites Angular 2, this is simple tutorial for those who are beginner and started learning & development with Angular 2. Tutorial is set of step one should follow to communicate with Restful Server service like Asp.net webApi to perfrom CRUD (Create, Read , Update & Delete) operation.

Tutorial is divided in two parts first part is creation of simple Asp.net WebApi i.e Restful server side service and second part is creation of Angular 2 application which consiste of just one page to consume webapi.

First part - Creation of Restful Service (webApi)
What is Asp.net WebApi? Asp.net Webapi is MVC based framework provided by Microsoft to create Resful web Api (i.e. restful web servie). one of advantage of web api is easy to create and cosnume. As its restul its compiable with HTTP protocol and HTTP verb. One should follow this link to learn more about it : Asp.net WebApi Before start creating webApi one must need to have Visual Studio installed on machine. Once one have visual studio follow the below steps

1. Create new solution and add new project in it. As shown in below image
  •  Selecte language of development (here C# is chosen) 
  •  Selecte Web unser language 
  •  Selecte 'Asp.net Web Application' template
  •  Enter project name (here Employeemengementapi is project name) 
  •  Click Ok.

2. On next window
  • Select 'Empty' Template
  • and Select 'WebApi' checkbox 
  • click Ok.

3. Once proper input is given during project creation, Visual studio create project structure as given in below image. Now one is ready to code Restful webApi.

4. Once project structure is ready, first task is to add Model Class. Model class is object which can be sent from server to client as response from controller or object received by contoller from client as part of request. To add model class just right click on Model foler and click add class.

5. Add enter name of model class as shown in below image and click add it will create plain class under model folder.

Below is simple Employee Class created as model, which is going to be used in the tutorial.
namespace EmployeeManagmentApi.Models
{
    public class Employee
    {

        public int ID { get; set; }

        [Required]
        public string firstname { get; set; }

        public string lastname { get; set; }
    }
} 

6. Once project structure is ready, first task is to create Contoller. Contoller in MVC framework does heavy lifting job of hadling income client request and providing proper response to client. As given in below image one need to right click on solution folder and select add contoller.

7. Once add click , it display template for controller and as there is no fancy stuff involved (i.e. no entity framework related things) and as its WebApi for this tutorial 'Web API Contoller with read/wrtie actions' selected as given in below image.

8. Once clicked on Add in above screen it will display from where one should enter name of controller. once clicked it will create conroller with read/write action.

Below is code of contoller which is written for this tutorial. As part of tutorial just going to demostrate HttpGet request so only created one new method which is going to return Employee object.

one important thing to note here is [EnableCors(origins: "*", headers: "*", methods: "*")] line which is above controller , thats line is added to provide support for cross domain request (i.e. request which comes from other domain). More about cross domain request : CORS
namespace EmployeeManagmentApi.Controllers
{
    [EnableCors(origins: "*", headers: "*", methods: "*")]
    public class EmployeeController : ApiController
    {
        // GET: api/GetEmployees
        public IEnumerable<Employee> GetEmployees()
        {
            List<Employee> emplist = new List<Employee>
            {
                new Employee{ ID=1, firstname="Pranay", lastname="Rana"},
                new Employee{ ID=2, firstname="abc", lastname="xyz" }
            };

            return emplist;
        }

        // GET: api/Employee/5
        public string Get(int id)
        {
            return "value";
        }

        // POST: api/Employee
        public void Post([FromBody]string value)
        {
        }

        // PUT: api/Employee/5
        public void Put(int id, [FromBody]string value)
        {
        }

        // DELETE: api/Employee/5
        public void Delete(int id)
        {
        }
    }
}

9. once done with Controller and Model, one should modify the WebApiConfig.cs file which helps to configure webApi, such that it meets with the requirements like handling of Cross Domain request, Respose formate, Routes to serve request etc. Below is code for the same.

namespace EmployeeManagmentApi
{
    public static class WebApiConfig
    {
        public static void Register(HttpConfiguration config)
        {
            // Web API configuration and services
            config.Formatters.Remove(config.Formatters.XmlFormatter);
            
            // Cross domain reuest configuration 
            config.EnableCors();

            // Web API routes
            config.MapHttpAttributeRoutes();
             
            config.Routes.MapHttpRoute(
               name: "NamedactionApi",
               routeTemplate: "api/{controller}/{action}/{id}",
               defaults: new { id = RouteParameter.Optional }
           );


            config.Routes.MapHttpRoute(
                name: "DefaultApi",
                routeTemplate: "api/{controller}/{id}",
                defaults: new { id = RouteParameter.Optional }
            );
        }
    }
} 

Note : make sure you must install Microsoft.AspNet.WebApi.Cors package that is required for cross domain request handling code.

10. once done one can easily test web api just by typing url in browser as given in below image. It working as its get request but if want to test for other type request like Delete (HttpDelete), Update(HttpPut), Create (HttpPost), one should make use of Postman or fiddler.
This is end of first part of this tutorial, creation of webapi. In tutorial Asp.net WebApi is used but its not necessary to use it one can make use of other serside techonlogy.


Second part : Creation of Angular 2 App
Before starting with second part i.e. Angualr 2 App, one must needs to be ready with development environment. one must need to have following installed in machine
  1. Visual Studio Code
    Visual Studio code is development tool provided by Microsoft. Some of the majaor advatnages of it is it's free and not heavy tool as Visual Studio, lot of plugin/ etension avaiable which helps in development.
  2. Node.Js &npm :
    It's required to manage and install libaray / packages. It's runtime which convert typescript code in javascript code which broswer understand and run application in browser.
  3. Angular Cli
    It's helpful commandline utility which helps from project start (setup new application) till end (deployment of project). Some of the advantages are easy project creation, allows to create module, component, service, model class, pipe etc. (i.e used for scofolding) just help of commands, setup lint which helpful in code formatting during development, webpack - which help in bundling typescript/javascript/css files and create chunk of code,testing, minifying, .
  4. Version Control Tool (ex. GitHub)
    It's helpful for keeping code which at location, from which you can retive code and keep version of code so allow to compare between diffrent version of code.
  5. BootStrap
    This is not must needed pacakge, but it's helful if you don't want to spend much time in styling your application. It's css libarary comes up with ready made Styles (CSS) and some simple jQuery stuff. I makes development faster.
Once all the above installed (except BootStrap which requried to be install after project get created) , we are ready to go with first Angualr 2 app

1. Create application by running angular cli command 'ng new [projectname]', as given below


This command will create folder with all necessary things required for angular 2 app and it's also install necessary packages which is listed in package.json file.
Note: command ran with --routing argument, it will create routing module with new application , its needed as sooner or later you need more number of pages in your application and want to navigate betwen that pages.
Once folder got created in local drive suggestion is close command prompt window. And if you see failure during installtion of package just leave it and close command prompt.

2. Now open Visual Studio Code on your machine and click on open folder, then navigate to the path where folder got created and click 'Select Folder'.


3. Visual Studio code shows folder structure as below in visual studio code.


Important file in folder strucutre are
  1. Package.json - File which contains all packages that installed for the project i.e. file used for managing packages in project.
  2. tsconfig.json - File cotains setting related to typescript compiler , i.e. setting to compile typscript .
  3. src - folder going to contains all the code (module, component, pipe, service etc.) for creating application.
    src> Application -When new application get created it got created with default Application Module and Application Component.
  4. src > asset - folder conatins style, images used in project.
  5. node_module - folder conatins all installed packages. which lis listed in package.json.
  6. src > environment - contains files which is having setting realted to current running environment. i.e. contains settings file for dev, prod and test evnvironment related settings file.
  7. e2e - stand for end to end testing.
  8. src > polyfill.js - file contains code to render application on all broswer.
  9. tslint.json - File contains all setting related to linting code i.e. formatting code properly duing development.
  10. angular-cli.json - file contains setting related to angular cli utility, this setting used by angular cli utility.
  11. index.html - page get loaded in when user brows and its page which load angular application.
  12. main.ts - file contains application bootstaping realted code. It conatins reference to module which first needs to be get loaded when application start. In newly created application it contains reference to 'ApplicationModule'.
4. After opening application, start integarter terminal in visual studio, by clickin on View > integrated terminal. This will open up command line in visual studio.
run command 'npm install' if pacakage installation not done during proect creation. after that first run 'ng serve' command it will run application and to check it worked correctly. Go to url : http://localhost:4200 it will open up defaultly created application.
Now, remove all unecessary stuff i.e. html from index.html file.
5. Run command npm install bootstrap and install bootstrap in project. After intallation done to make use of bootstrap in project, there is need of modifying angular.cli.json file as below.

      "styles": [
        "styles.css",
        "../node_modules/bootstrap/dist/css/bootstrap.css"
      ],
      "scripts": [
        "../node_modules/bootstrap/dist/js/bootstrap.js"
      ],

Go to Angualr cli.json locate styles and scripts array and add path of .css and .js file of bootstrap.

6. Now run following command in integrated terminal i.e. command line same given in below image.
  1. ng g module feature/employees --routing
    This command create new mdoule called employess with routing feature.
  2. ng g component feature/employees
    command create feature called employees in employee module.
Both command as seen in image below run with --dry argument to command. This agrument allows to see one what modification command will do in project before running it.


Note: Please follow : style guide for recomended angular application structure.
As per guide application should have follwing folder under src folder
  1. Application - this folder is already there when you create new project, its folder which contains application module.
  2. Feature - this folder conatins all the feature going to be part of applicatio. for eample in Employeemangment application its will going to have feature like Employees (componet for employee add,delete,update & read), Department (componet for employee add,delete,update & read)etc.
  3. Core - this folder going to contains application core, it contains all the singleton services that is going to be used by features modules , it will contains service like application wide exception service, application wide user profile service, nav bar etc.
  4. Shared - this folder going to contains all the comman services , pipe, component, directives which is going to be used by features modules.
Once command run it will create feature called Employees in project. One of the adavantage of creating module/component with angular it will do all necessary modification in project like adding routing, adding newly created component to module, so it saves effort of going to each file add adding this details. It also create module,compoent,servie,pipe, directive with proper etension like xyz.mdoule.ts. xyz.component.ts etc. as per style guide to identify given file is for compoenet or module or service etc.

7. Next step is to add model in feature its interface going to have structure similar response structure which comes after making http call from service. It's kind of plain property class.
command : ng g interface feature/employees/model creates model interface model.

Modify model.ts as below

export interface Employee {
    ID?: number;
    firstname?: string;
    lastname?: string;
}

8. Once module, component get created. Make use of below command it will add service i.e. data service which is going to be used by Employee module. DataService mostly going to have code which communicate with serverside api.
command : ng g service feature/employees/employees -m=feature/employees/employees.module create dataservice called employee and also add service as provider list in module defination file as given in below image.


Modify employees.service.ts as below

import { Injectable } from '@angular/core';
import { HttpClient, HttpHeaders } from '@angular/common/http';
import { Observable } from 'rxjs/Observable';

import { Employee } from './model';

@Injectable()
export class EmployeesService {

  apiUrl = 'http://localhost:1800/api/demo/';
  constructor(
    private http: HttpClient
  ) { }

  getEmployees(): Observable<Employee[]> {
    const url = `${this.apiUrl}getemployees`;
    return this.http.get <Employee[]>(url);
  }
} 

Some of change to note here is
  1. HttpClient - injected in employee service. it's service provided as part of Angular 2 framework for communicating with serverside service. In this tutorial its going to comuunicate with EmployeeManagementApi webapi created in first part.
  2. getEmployees - method of service which make use of http service and calls getEmployees method of web api to get all employees.
Note: Tutorial is just making use of HttpGet call to bring data but one can easily read other methods provided by HttpClient put, post etc. which map with other HttpVerb to perform operation like Create, Update and Delete.

9. Once done with above changes do modify , componet files as below

employees.component.ts
import { Component, OnInit } from '@angular/core';
import { EmployeesService } from './employees.service';
import { Observable } from 'rxjs/Observable';
import { Employee } from './model';

@Component({
  selector: 'app-employees',
  templateUrl: './employees.component.html',
  styleUrls: ['./employees.component.css']
})
export class EmployeesComponent implements OnInit {

  employees: Observable<Employee[]>;
  constructor(
    private employeesService: EmployeesService
  ) { }

  ngOnInit() {
    this.employees = this.employeesService.getEmployees();
  }
}

typescript code in this inject employeeservice. Make call to employeeservice > getemployees method form ngInit to get employees from server and it stores response coming out from servers in observalbe of employee array.

employees.component.html
 <div class="container">
  <h2>Employees</h2>
      
  <table class="table table-striped">
    <thead>
      <tr>
        <th>Id</th>
        <th>Firstname</th>
        <th>Lastname</th>
      </tr>
    </thead>
    <tbody *ngIf='employees'>
      <tr *ngFor="let employee of employees | async">
          <td>{{employee.ID}}</td>
          <td>{{employee.firstname}}</td>
          <td>{{employee.lastname}}</td>
      </tr>
    </tbody>
  </table>
</div>

html code make use of async pipe of angular framework to subscribe obersable employees created in typescript file and get actual employee array. Code also make use of *ngFor angular framewrok directive to go through all the employess in received array and create table row.

10. Afer all change done run command 'ng lint' to find out if there is any lint error i.e. code formatting error.

11. Below screen shot shows final output of the tutorial.


Conclusion
Tutorial covers most of the basic which one needs to start with angula 2 application (except testing of application). One should find full code of tutorial here : WebApi - EmployeeManagementApi AngularApp - EmployeeManagment