Pranay Rana

Monday, November 2, 2020

Work Partitioning - Process large amount of records in C#

What is Work Partitioning ?

Work Partitioning means dividing big/large amount of work between workers. Which means if you have work which is going to take 100hrs to complete by one worker you divide it among multiple worker lets between 10 workers who work parallel , then work of 100hrs get complete in 10hrs. So work partitioning helps to complete works faster.

Once can apply work partitioning to process data faster by dividing work among set of machines (like in big data where large amount high volume data processed by set of machines located at on premise or at in cloud) or process incoming request by set of machines with help of Load Balancers. But in this post I am going to put information about partitioning work in Process/Application using Task Parallel library of C# language.

Below is code that make use of C# task parallel library and does the processing of lots of records, here is 1m records.

public List<TransFormedCustomer> GetProcessData()
{
    var processRecordCount = 10000;
    var retModels = new List<TransFormedCustomer>();
    var lotOfRecords = GetFakeData(); //example million records from datasource like database, web service, csv file

    int tasksCount = (lotOfRecords.Count / processRecordCount);
    if (lotOfRecords.Count % processRecordCount > 0)
        tasksCount++;

    var tasks = new Task<List<TransFormedCustomer>>[tasksCount];
    for (int i = 0; i < tasksCount; i++)
    {
        IEnumerable<Customer> datas;
        int skip = (processRecordCount * i);
        int take = processRecordCount;

        if (i == 0)
            datas = lotOfRecords.Take(take);
        else
            datas = lotOfRecords.Skip(skip).Take(take);

        tasks[i] = Task.Factory.StartNew((obj) => GetProccessedData(datas), Tuple.Create(skip, take));
#if DEBUG
        if (i == tasksCount - 1 && lotOfRecords.Count % 10000 != 0)
           take = lotOfRecords.Count % 10000;
        Console.WriteLine($"task no {i} started, reading from {skip} to {skip + take}");
#endif
    }
    try
    {
        Task.WaitAll(tasks);
    }
    catch
    {
        //left empty as logging errors in below foreach block
    }

    foreach (var task in tasks)
    {
        if (task.IsCanceled || task.IsFaulted)
        {
            var state = (Tuple<int, int>)task.AsyncState;
            Console.WriteLine($"taks failed to process data from {state.Item1} to {state.Item2}");
        }
        else
            retModels.AddRange(task.Result);
     }

    return retModels;
} 
Code works above works as follows
  1. It sets number number of records one task can process , here in code its 10000 set in "processRecordCount" variable. 
  2. Code get 1m records from the datasoruce, here "GetFake()" method(code listed at the end) returns 1m customers records 
  3. "taskCount" variable stores number of task need to process received records ("GetProccessedData(datas)"- method listed below) i.e. here its 100000/1000 = 10 number of task required to process records.
  4. In for loop with help of "Take" or "Skip" , each task get 10000 to process. 
  5. "Task.WaitAll()" wait for all task to finish work
  6. After work get finished by each task, processed records get added to "retModels" collection.
  7. If task to fail to process record then it logs information on console. 

Output

As shown in above image each thread does processing of 10000 records and each pick different set of records. 

Followings are advantages of work partitioning
  1. Very huge amount of data get processed faster as it gets process parallelly with help of tasks i.e. workers\
  2. It make use of multicore CPU i.e. computing efficiently as one task get processed by one core mostly   
Code used to support above function   

GetFakeData- method

Fake data produced by using Faker.Net "install-package Faker.Net"

private List<Customer> GetFakeData()
{
    var customers = new List<Customer>();
    for (int i = 0; i < 100000; i++)
    {
        customers.Add(
            new Customer()
            {
                FirstName = Faker.Name.First(),
                LastName = Faker.Name.Last(),
                EmailAddress = Faker.Internet.Email(),
                SSN = Faker.Identification.SocialSecurityNumber()
            }
            );
    }
    return customers;
}
GetProccessedData-Method
private List<TransFormedCustomer> GetProccessedData(IEnumerable<Customer> customers)
{
    var transFormedCustomers = new List<TransFormedCustomer>();
    foreach (var customer in customers)
    {
        //do processing on recevied data 
        //enrich data and add it to process collection 
        string formattedSSN = customer.SSN.Insert(5, "-").Insert(3, "-");
        string formattedName = customer.FirstName + ' ' + customer.LastName;
        string email = customer.EmailAddress;
        Regex regex = new Regex(@"^([\w\.\-]+)@([\w\-]+)((\.(\w){2,3})+)$");
        Match match = regex.Match(email);
        if (!match.Success)
            email = "dummy@dummy.com";
        var transFormedCustomer = new TransFormedCustomer()
        {
            Name = formattedName,
            SSN = formattedSSN,
            EmailAddress = email
        };

        transFormedCustomers.Add(transFormedCustomer);
    }
    return transFormedCustomers;
}
Customer & TransformCustomer Modal class
    public class Customer
    {
        public string EmailAddress { get; set; }
        public string FirstName { get; set; }
        public string LastName { get; set; }
        public string SSN { get; set; }
    }

    public class TransFormedCustomer
    {
        public string EmailAddress { get; set; }
        public string Name { get; set; }
        public string SSN { get; set; }
    }
 

Thursday, January 31, 2019

Self Host Angular and WebApi Using Owin

Full Source code at GitHub : OwinWebapiAngularHost

In development there are situations(organization restrictions, developing POC/Demo, there is need of control on server) where developer doesn't have Server application(IIS,Tomcat etc.), where developer got and deploy Web application. So to overcome these situation developer need environment which similar to Server application, basically issue can be resolved by having Self hosting application. Self hosting application allows to deploy web application and provide similar functionality as server application.
Question rises how to create self hosting application, answer is by making use of Owin like Framework. Below post is about how to create self hosting application with help of Owin framework which in turn allows to host Asp.Net WebApi and Angular application.

Creating Self Hosting application
To create self hosting application, developer can create either Console, WPF or Windows Form Application or Windows Service by choosing Console, WPF or Windows Form or WindowsService project type provided in visual studio.
For this post I am choosing Windows Service project as given in below image

Once click "ok button" it will create windows service application in visual studio. But when run application by pressing "F5" in visual studio it display message


To avoid error in development environment , do check for service running in user interactive check flag "UserInteractive". Below code shows how to do it

static class Program
{
        /// 
        /// The main entry point for the application.
        /// 
    static void Main(string[] args)
    {
        try
        {
            //flag check service running in user interactive mode i.e. debug mode 
            if (Environment.UserInteractive)
            {
                Service1 service1 = new Service1();
                service1.TestStartup(args); // start service in debug mode
                Console.WriteLine("Service Started at: http://localhost:8081/File/action");
                Console.ReadLine(); // stop service in debug mode
                service1.TestStop();
            }
            else
            {

                ServiceBase[] ServicesToRun;
                ServicesToRun = new ServiceBase[]
                {
                 new Service1()
                };
                ServiceBase.Run(ServicesToRun);
            }
        }
        catch(Exception ex)
        {
           Console.WriteLine(ex);
           //log error 
           Console.ReadLine();
        }
    }
}


Once done add below code in service.cs file which is related to windows service application

public partial class Service1 : ServiceBase
{
    public Service1()
    {
        InitializeComponent();
    }

    protected override void OnStart(string[] args)
    {
       if (ConfigurationManager.AppSettings["baseAddress"] != null)
          baseAddress = ConfigurationManager.AppSettings["baseAddress"].ToString();
       server = WebApp.Start(baseAddress);
    }

    protected override void OnStop()
    {
        server.Dispose();
    }

    internal void TestStartup(string[] args)
    {
        this.OnStart(args);
    }

    internal void TestStop()
    {
        this.OnStop();
    }
    
    private IDisposable server;
    string baseAddress = "http://*:8081/";
} 
Line of code written in OnStart method of service file is most important code, "WebApp.Start()" this method start Owin web server at "8081" port by making use of settings provided in "OwinStartUp"(setup of this class discussed in detail below) class.

Installing Owin
After creating and setting Windows service, now it's time to install Owin framework which provide support for hosting web based application. Owing installation can be done via "Package Manager console (this console can be opened up from Visual studio menu Tools>>Nuget Package Manager >> Package Manager Console)" or by "Manage Nuget Packages(this is menu option comes by right clicking project in visual studio)".

//run below command in package manager console to install owin support
Install-package Microsoft.Owin.SelfHost
//or search package "Microsoft.Owin.SelfHost" in package management window  
This command installs following packages, one can view in package.json file of project or in references as dll.
  
  Microsoft.Owin
  Microsoft.Owin.Diagnostics
  Microsoft.Owin.Host.HttpListener
  Microsoft.Owin.Hosting
  Microsoft.Owin.SelfHost
  Owin

Installation of basic packages enable Owin in windows service application. To make use of Owin, developer needs to add settings which decide what type of application/files can be served by self hosted owin server application. Below is basic "OwinStartUp" class that used by "WebApp.Start()" method to start server.

//OwinStartUp.Cs
public class OwinStartUp
{
    public void Configuration(IAppBuilder app)
    {
#if DEBUG
        app.UseErrorPage();
#endif
        app.UseWelcomePage("/");
    }
}


Enable WebApi Hosting
To enable WebApi hosting in above created self hosted owin based application, Add below package

//run below command in package manager console to install WebApi support
Install-Package Microsoft.AspNet.WebApi.OwinSelfHost
//or search package "Microsoft.AspNet.WebApi.OwinSelfHost" in package management window  

This command installs following packages, one can view in package.json file of project or in references as dll.
  
  Microsoft.AspNet.WebApi.Client
  Microsoft.AspNet.WebApi.Core
  Microsoft.AspNet.WebApi.Owin
  Microsoft.AspNet.WebApi.OwinSelfHost
  Newtonsoft.Json

Once installation done, below line of code in start setting class enable support of WebApi hosting in application

public class OwinStartUp
{
    public void Configuration(IAppBuilder appBuilder)
    {
  // Configure Web API for self-host.
  //Install-Package Microsoft.AspNet.WebApi.OwinSelfHost

  //removing support of xmlformatter
  HttpConfiguration config = new HttpConfiguration();
  config.Formatters.Remove(config.Formatters.XmlFormatter);

  //webapi route configuration
  config.Routes.MapHttpRoute(
   name: "DefaultApi",
   routeTemplate: "api/{controller}/{action}/{id}",
   defaults: new { id = RouteParameter.Optional }
  );

  config.MapHttpAttributeRoutes();

  //adding config for WebApi support
  appBuilder.UseWebApi(config);
    }
}

After adding support for WebApi, developer can add WebApi controller as given below.

public class TestController : ApiController
{
    [HttpGet]
    public string GetFileName()
    {
        return "Test";
    }
} 


Enable support for CORS
Above add support for WebApi, but it won't allows to access form other domain apart form hosted domain i.e. from Cross domain. Developer can resolve issue of CORS as below.

//run below command in package manager console to install Cors support
Install-Package Microsoft.Owin.Cors
//or search package "Microsoft.Owin.Cors" in package management window  

This command installs following packages, one can view in package.json file of project or in references as dll.
  
  Microsoft.Owin.Cors
  Microsoft.AspNet.Cors

Once installation done, below line of code enable CORS
  
public class OwinStartUp
{
    public void Configuration(IAppBuilder appBuilder)
    {
        //webapi code done before remain as is
  
        //Install-Package Microsoft.Owin.Cors
        appBuilder.UseCors(Microsoft.Owin.Cors.CorsOptions.AllowAll);
    }
}

So now self host is ready with WebApi hosted in it.

Enabling Angular/Static file hosting
Enabling self host for angular is similar to enable self host for allowing browsing of static html files i.e. web site. Because angular is framework for creating single page application which access by accessing "index.html" file only.

Note:
For hosting angular application please perform prod build (by using angular cli command ng build --prod) of you application as it has prod generated code i.e. html page with javascript only. Guide for Angular deployment : https://angular.io/guide/deployment

To enable WebApi hosting in above created self hosted owin based application, Add below package

//run below command in package manager console to provide static website /angular app support
Install-Package Microsoft.Owin.StaticFiles
//or search package "Microsoft.Owin.StaticFiles" in package management window  

This command installs following packages, one can view in package.json file of project or in references as dll.
  
  Microsoft.Owin.FileSystems
  Microsoft.Owin.StaticFiles

Once installation done, below line of code in start setting class enable support of Static Web app/Angualr app hosting in application

public class OwinStartUp
{
    public void Configuration(IAppBuilder appBuilder)
    {
       //hosting static files i.e. angular
       //install-package Microsoft.Owin.SelfHost
       //install-package Microsoft.Owin.StaticFiles
       var options = new FileServerOptions();
       options.EnableDirectoryBrowsing = true;
       options.FileSystem = new PhysicalFileSystem("./app");
       options.StaticFileOptions.ServeUnknownFileTypes = true;
       appBuilder.UseFileServer(options);

      //code done for WebApi remain as is if you want webapi support 
   }
}

Below is full source code done in this excercise
    
    public class OwinStartUp
    {
        public void Configuration(IAppBuilder appBuilder)
        {

            //hosting static files i.e. angular
            //install-package Microsoft.Owin.SelfHost
            //install-package Microsoft.Owin.StaticFiles
            var options = new FileServerOptions();
            options.EnableDirectoryBrowsing = true;
            options.FileSystem = new PhysicalFileSystem("./app");
            options.StaticFileOptions.ServeUnknownFileTypes = true;
            appBuilder.UseFileServer(options);


            // Configure Web API for self-host.
            //Install-Package Microsoft.AspNet.WebApi.OwinSelfHost
            HttpConfiguration config = new HttpConfiguration();
            config.Formatters.Remove(config.Formatters.XmlFormatter);

            config.Routes.MapHttpRoute(
                name: "DefaultApi",
                routeTemplate: "api/{controller}/{action}/{id}",
                defaults: new { id = RouteParameter.Optional }
            );

            config.MapHttpAttributeRoutes();
            appBuilder.UseWebApi(config);

            //Install-Package Microsoft.Owin.Cors
            appBuilder.UseCors(Microsoft.Owin.Cors.CorsOptions.AllowAll);
        }
    }

Full Source code at GitHub : OwinWebapiAngularHost

Saturday, January 19, 2019

Return Given Type from Generic method

In C#, Genetic method as below, which can return value of multiple types (i.e. below method can return value of any primitive types or reference types).
   public T GetValue<T>()
   {
  
   }
so one cannot return value directly from method. As T is template type & it can be any of type, so compiler doesn't allow direct conversation of return value to type T.
   public T GetValue<T>()
   {
     //Compilation error (line 13, col 10): Cannot implicitly convert type 'Customer' to 'T'
     return new Customer();
     //this error says that T is template type and it can be of any type (primitive or reference)
   }
Above will not work because Template type of Generic method get replaced at Runtime and Compiler of C# cannot able to figure out Generic type actual type at compile time. for example call to method is like as below
// call to method
GetValue<int>()

//then at runtime method will be like as below 
public int GetValue<int>()
{
 //assuming generic method return customer object only 
 return new Customer();
}

Solution 
As explained in detail problem with generic method is to return value of requested return type (i.e. Runtime type which replaces generic Template type T). So to solve problem return value to object type(as object is base class of all types in C# .net) and then convert it to generic template type. Below is code for that solves problem
public T GetValue<T>()
{
  Type typeParameterType = typeof(T);
    Type typeParameterType = typeof(T);
  if(typeParameterType.ToString()=="System.Int32")
    return (T)(object)1;
   if(typeParameterType.ToString()=="Customer")
    return (T)(object)new Customer()
}

But problem with above code is ,for every new return type value new condition required to be added in method i.e it requires to change method for every new return type and it violates Single responsibility principle.

This can easily be resolved by making use of C# in built method Convert.ChangeType, below is code for the same
  (T)Convert.ChangeType(1, typeParameterType)//here T is generic type

Below is code for getting value of column form DataRow object which is based on above discussion
  public static T GetColumnValue<T>(this DataRow dr, string columnName)
  {
     //get type of Template type T
     Type typeParameterType = typeof(T);
     //get type of Template type T, this works when requested type is nullable
     typeParameterType = Nullable.GetUnderlyingType(typeParameterType) ?? typeParameterType;

     //check value present or not , if not return default value of generic type
     return dr[columnName] != DBNull.Value
                ? (T)Convert.ChangeType(dr[columnName], typeParameterType)
                : default(T);
   } 
//use of this method in code 

datarow.GetColumnValue<int>("id");
datarow.GetColumnValue<int?>("orderid");
datarow.GetColumnValue<double>("amount");

so above is Generic method to get value of datacolumn of given type. Method get value of return type from template type T and then does conversation of datacolumn value using Convert.ChangeType.

Below is example of Factory Design pattern using same technique
public class CommandFactory
{       
    //only create object of type which implement ICommand
    public static T GetCommand<T>() where T:  ICommand
    {
      //it create object using Template type T and by making use of reflection
      //once create factory this way there is no need to open it again for modification
        Type type = typeof(T);
        Object obj = Activator.CreateInstance(type);
        return (T)obj;
    }
}

Read about this in detail here : Factory Design Pattern With Generics

Saturday, August 18, 2018

CSS to Less

CSS to Less - It's about what are the motivating factor, which Less have that encourage developer to make use of this extended languages. Below post is not provide details information about Less, it provide introduction to features provided by Less. Post is helpful to those who are looking for brief introduction to features of Less, higher language developer who work sometimes with CSS and for the beginner.

CSS

CSS (Cascading style sheet) - it used with HTML element to to beautify web pages of web application. It use to define set of style(s) (i.e set of style rules), for mostly each element in web page to beatify each element. Style defined with CSS , gives each element same look. For Example

h1 {
 Color: red;
}

this style rule give each h1 element black color. If style changes i.e. color changed from read to green then it will affect all h1 element in web pages of web application.

Above brief explanation of what is CSS and why to use it in web application (find full details: https://www.w3.org/Style/CSS/Overview.en.html).

Following problem arise once CSS implemented for application
  1. Every style rule go in one file, File size increases.
  2. Modification becomes difficult Ex. same color used in multiple styles then one need to go every where and need to modify it.
  3. If style sheet divided in multiple style sheet , browser create multiple request to download each individual CSS file.
  4. If style sheet divided in multiple files then , modification of common color, font used becomes too difficult.
  5. Nested element or Pseudo Style rules are difficult to understand and maintain as CSS file increases.
Less

Less (Leaner style sheet) which is CSS extension.  Less, have features like allow to define Variables & Mixins (like functions), Set of Inbuilt function, Support for arithmetic operators,  Tools supported Create single CSS file as output from multiple Less files etc. So feature provided by Less is some what equal to programming language and that in turn very much helpful to developer who are working more on programming language & less on CSS styles.

Browser only understand HTML + Javascript + CSS style rules when loading web page of application,  which means that it doesn't understand Less. So, Like Typescript transpile to Javascript with help of transpilers. Less style rules get converted to CSS style rules as output by various available transpilers/compilers (check list here : http://lesscss.org/tools/#online-less-compilers).


Following way Less helps to overcome problem associated with CSS.
  1. Difficulty in modification of style property which having same value and located in different rules. Ex. Colors, Font-Size, etc.

    For example below CSS, each element style rule have color property. Now if there is need of changing this color value "#003152" to "red". As part of color changing exercise CSS developer needs to locate each rule and have to replace color value to red.

    h1 {
     color: #003152;
    }
    body {
        color: #003152;
    }
    a:active {
        color: #003152;
    }
    

    Locating each rule and changing color to "red" can lead to a problem if CSS file size is big or if the CSS style rules are located in different files.

    Solution - Less Variables
    This can be resolve in Less by making use of variable, as given in below code.

    @color: #003152;
    
    h1 {
     color:@color;
    }
    body {
        color: @color;
    }
    a:active {
        color: @color;
    }
    

    So one value of color stored in variable , change needs be done is change value of variable.
    Other use cases of variable is as below

    @color: red;
    @background-color: black;
    @base-font-size : 10px;
    @images: "./assets/images";
    @font-family: "Times New Roman", Times, serif";
    
    h1 {
     font-size: @base-font-size + 10px;
    }
    body {
        color: @color;
        font-family: @font-family;
        font-size: @base-font-size;
        background-color: @background-color;
    }
    .input {
      font-size: @base-font-size + 2px;
    }
    a:active {
        color: @color;
        font-size: @base-font-size + 2px;
    }
    .button {
      background-image: url("@{images}/backimage.ico");
    }
    

    Point to not in above Less code
    • As listed in above variable in LESS , allows to store  color values, string values, numeric values alone and with units (like %, px, etc.).
    • Less allows to perform numeric operation like =, - on numeric values Ex. @base-font-size stores numeric value and + operation performed in .input,he style rules.
    • Less allows string interpolation , Ex. in above code @image variable defines path , which can be used any where like used in .button style rule

    Advantage
    • Less Variable allows to store common values which can be used in multiple style rules not in single file but one can use same variable in multiple files (how to use in multiple files discussed below).
    • Developer can store common and keep changing values in variable, so if have to perform modification just changing variable works.
    • Less variable can easily allows to achieve multiple colored base Theme  as just changing variable values different value is easy task.
    • Variables in Less makes life too easy for developer who is working on CSS , specially those developer who are working on programming language like C#,java and some time work with CSS.

  2. CSS style rules with common property need to be repeated in each rule.

    In CSS even though multiple style rules use same property and with same value , its required to be repeated that in each style rule as given in below example

    input {
        font-size: 12px;
        background-color: white; 
        height: 20px;
    }
    
    select {
        font-size: 12px;
        background-color: white; 
        height: 25px;
    }
    
    select[multiple] {
        font-size: 12px;
        background-color: white; 
        height: 250px;
    }
    

    so in above example each property get repeated for different input elements except height property which is having different value.

    Solution - Less Mixins
    Less solves this problem by providing Mixins. Below code show how Mixins solve problem of common properties.

    .input-base {
        font-size: @base-font-size + 2px;
        background-color: @input-backcolor; 
    }
    
    input {
        .input-base();
        height: 20px;
    }
    
    select {
        .input-base();
        height: 25px;
    }
    
    select[multiple] {
        .input-base();
        height: 250px;
    }
    

    so in style rules , .input-base is treated as Mixin which get called by all input style rules just to make use of common properties.

    Mixins like function in programming language , takes argument as input and also allows arguments with default value as in below code.

    .input-base (@height, @font-size: @base-font-size) {
        font-size: @font-size + 2px;
        background-color: @input-backcolor; 
        height:  @height;
    }
    
    input {
        .input-base(20px);
    }
    
    select {
        .input-base(25px);
    }
    
    select[multiple] {
        .input-base(250px, @base-font-size + 2px);
    }
    

    So in above code Mixin .input-base takes two argument like function as input. Based on input value Mixins copy property values to given style rule.

    Less Extend
    Less also have one another way for above problem, which making use of &:extend(.stylerule), like as given in below code.

    .input-base {
        font-size: @base-font-size + 2px;
        background-color: @input-backcolor; 
    }
    
    input {
        &:extend(.input-base);
        height: 20px;
    }
    
    select {
        &:extend(.input-base);
        height: 25px;
    }
    
    select[multiple] {
        &:extend(.input-base);
        height: 250px;
    }
    

    as name suggest extend , it extends CSS style rule. It's similar to inheritance in higher level programming language like C#,Java.

    Difference between &:extends and Mixins are
    • Mixins works like function i.e. takes argument as input, which is not possible with extend.
    • The way CSS generated by Mixins and Extend.

      Mixins generate CSS as below 
      input {
          font-size: 12px;
          background-color: white; 
          height: 20px;
      }
      
      select {
          font-size: 12px;
          background-color: white; 
          height: 25px;
      }
      
      select[multiple] {
          font-size: 12px;
          background-color: white; 
          height: 250px;
      }
      

      So Mixins copies each properties in each style rule , so it increase size of style sheet.

      Extend generate CSS as below
      .input-base,
      input,
      select,
      select[multiple] {
        font-size: 12px;
        background-color: white;
      }
      input {
        height: 20px;
      }
      select {
        height: 25px;
      }
      select[multiple] {
        height: 250px;
      }
      

      So extend generate less style sheet and instead of copying each property in each style rule it actually extends existing style rule.

  3. Difficulty in maintaining Nested element style rules.

    In html document consist of nested element (like parent-child element). CSS allows to set style rule for this nested element relationship Example.  <li> child element under parent <ui> or <a> child element under <li> ,  <li> child element under parent <ui>. Example given below

    <ul>
      <li>
        <a href="http://google.com/" rel="noopener" target="_blank">google</a>
      </li>
      <li>
        <a href="http://localhost:8080/abc.com" rel="noopener" target="_blank">Test</a>
      </li>
    </ul>


    Below is style rules for nested elements

    ul li {
      font-size: 13px;
      color: red; 
    }
    ul li a {
      font-size: 13px;
      color: blue; 
    }
    Problem with above is very difficult to understand and read if developer is not aware of CSS nested styling rules.

    Less allows to write this nesting style rules as below which is easy to understand nesting (parent-child relation) and read.

    ul {
        li {
           a {
              font-size: @base-font-size;
               color: @font-color;
            }
        }
    }
    

    Above structure of CSS easily tell that a is child of li, and li is child of ui. and this will get apply to nesting structure which is like ui --> li --> a.

  4. Difficulty with managing element pseudo style rules.

    CSS force to write separate rules for each pseudo class like anchor tag a element which allows to add style rule on focus or hover or input element allows to add style rule for focus.

    Example CSS style rules for anchor tag a & hover on anchor tag, and input tag & focus on input

    a {
      color: #b3b3b3;
    }
    a:active {
      color: #003152;
    }
    input[type=text] {
      width: 100px;
      transition: width .35s ease-in-out;
    }
    input[type=text]:focus {
      width: 250px;
      border: 2px solid green;
    }
    

    Solution - Less nesting rules can easily encapsulate pseudo element style rules as given below.

    input[type=text] {
      width: 100px;
      transition: width .35s ease-in-out;
      &:focus {
         width: 250px;
         border: 2px solid green;
      }
    }
    
    a {
      color: #b3b3b3;
      &:active {
        color: #003152;
      }
    }
    

  5. Allows to in smaller manageable CSS files

    CSS allows to create smaller style rules files separately for different part of page like

    global.CSS
    navbar.CSS
    form-element.CSS
    etc.

    and with help of import statement CSS allows to import this files in each other or in one file. Example :

    In Application.CSS
    @import "global.css";
    @import "navbar.css";
    @import "form-element.css";

    But disadvantage are
    • Separate http request got created for each file when application loaded in browser and it will increase network traffic. Which means CSS doesn't combine all CSS file in one file.


    • One more disadvantage is if there need of changing common property like color , one needs to open each file and have locate style property to make change.

    Less allows importing of files same as CSS , but in LESS tools merge all different files as generate single CSS file.

    global.less
    variables.less ( this file contains all variables which is used by common properties like color, font-size, background color etc.)
    navbar.less
    form-element.less

    In Application.CSS
    @import "variables"
    @import "global"
    @import "navbar"
    @import "form-element"

    this will generate one file only, which get downloaded in on http reuqest. And as all common property value is replaced by variables which is stored in variable.less file , managing and changing common properties also becomes easy.

  6. Less having some set of inbuilt function.

    Less have lot of inbuilt function that also very helpful, which are also helpful.

    Example: below function helps to get different colors.
    color: darken(@body-color, 20%);
    border-color: lighten ( @body-color, 20%);
    

    there are lot of different function in Less helps in build styles for properties, find all functions here : http://lesscss.org/functions/
Conclusion
CSS allows to beautify html pages but extension like Less is very helpful. Less helps to overcome issues one face with CSS, also provide easy to understand, manage and simplify style rules with the help of feature like variables, mixins, extends, nesting structure, in build set of functions etc. However above is just start or overview of Less. Read in depth here : http://lesscss.org/features/

Sunday, July 15, 2018

Parsing Number with NumberStyles

Parsing string value to number i.e. converting string representation of number into number type is one of the basic task and most of programming language provides support to perform it easily. But sometimes developer writes too much complex code to perform this (string to number parsing) task as not aware about the easy way provided by programming language.

Below is small tip about parsing string representation of number to number type with respect to C# language. C# language has below numeric types 
  • integer types (sbyte, short, int, long, byte, ushort, uint, ulong),  
  • non-integer (number with precision or floating) types (float, decimal) 
and to convert string value in one of the above listed numeric type, C# language provide two methods


Above two method allows to convert string representation of number to string. For Example

int number = int.Parse("1234");
//or
//int number = -1;
//bool isPased = int.TryParse("1234", out number);
Console.WriteLine(number);

But it fails (i.e. throws run-time exception) when you try input as below

int parsedNumber = int.Parse(" -1234 ");
int parsedNumber = int.Parse("(1234)");
int parsedNumber = int.Parse("$1234");
int parsedNumber = int.Parse("1,234");
int parsedNumber = int.Parse(" (1,234) ")

So above all tried input throws run-time exception , but solution to is make use of overload of Parse and TryParse which comes with NumberStyles as input. Below is screen shot of overload of Parse method

below is code make use of overload and avoid run-time exception.

//output: -1234
int parsedNumber = int.Parse("(1234)", NumberStyles.AllowParentheses);

// output: 1234
int parsedNumber = int.Parse("1,234", NumberStyles.AllowThousands);

// output: -1234
int parsedNumber = int.Parse(" -1234  ", NumberStyles.AllowTrailingWhite |
                                              NumberStyles.AllowLeadingWhite |
                                              NumberStyles.AllowLeadingSign);

// output: -1234
int parsedNumber = int.Parse(" (1,234) ", NumberStyles.AllowTrailingWhite |
                                          NumberStyles.AllowLeadingWhite |
                                     NumberStyles.AllowParentheses |
                                          NumberStyles.AllowThousands);

// allows currency symbol
// output: 1234
Thread.CurrentThread.CurrentCulture = new CultureInfo("en-US");
int parsedNumber4 = int.Parse("$1234", NumberStyles.Currency);

Different number allows different input values. As given in above code one can put logic OR between  different value of NumberStyles and allows combination to permit various input format.

Try out other values of NumberStyles listed at MSDN: https://msdn.microsoft.com/en-us/library/system.globalization.numberstyles(v=vs.110).aspx  

Saturday, June 30, 2018

Different Kind of for loop construct in JavaScript/TypeScript

For Loop is very basic type of loop exist in all programming language. For loops allows to go over each items in iterable objects and allows to access each item of iterable objects. Each programming language provide different type of for loop to achieve purpose of iterating over iterable object and access each element to perform operation.

All programming language provide for loop (for(int i=0; i< array.length; i++)) i.e. indexed based and ForEach ( foreach(var ele in array)) i.e. element base.

But JavaScript/ TypeScript provides different type of for loops apart from basic once. Below are 4 different kind of JavaScript/ TypeScript

1. for
One of the most used and basic for loop to allows iterate block of code for predefined number.

Syntax
for (statement 1; statement 2; statement 3) {
    code block to be executed
}

Example code :
const array = [1,10,6,45,32];
for(let i=0;i< array.length;i++) {
 console.log(array[i]);
}

Above code shows one example how to use it, code prints each array item by rotating from 0 up to array length. Above example made using array of numbers but in real application one can create for loop just by setting numbers and execute block of code repeatedly for predefined numbers. So this loop is not restricted for iterables only.

2. for..of
allows to go over each item in iterable (Ex. like array, string, Map, Set, etc.)

Syntax
for (variable of iterable) {
  statement
}

Example code :
const array = [1,10,6,45,32];
for (const element of array) {
 console.log(element);
}

Above code does same thing as for loop code discussed above, go though each element of array and print.
But difference is for...of loop works only on the iterable objects and for each element of iterable, where as in basic for loop one externally need to set predefined number like from and to to execute block of code. So it helpful when want to execute on each element or by using each element of iterable.

Angular framework also have structural directive calle *ngFor for displaying data. Read more : Dynamic Html Structure with - *ngIf, *ngFor & ngSwitch

3. For In
allows to iterate over each property of object. This loop is different then other loops as it allows to go though object properties.

Syntax
for (variable in object) {
}

Example code:
const obj = { a : 1, b: 'Xyz', c:'123'};
for(let prop in obj) {
 console.log(prop +' : '+  obj[prop]);
}

code above prints each object property and value of it. Below is use cases when for..in very helpful.
  • Loop is useful when object structure is unknown (When object received as response from external api http call) and there is need of go through each property of object and display it.
  • It also useful when there is indexed (interface, class) object in type script and there is need of go through each indexed item without knowing key.
    Example:
    interface Product {
        [key: number]: string;
    }
    
    let products : Product = { };
    products[10]='xyz';
    products[20]='abc';
    
    for(let key in products) {
     console.log(key + ' : ' + products[key]);
    } 

4.  forEach(ele=> {} );
allows to iterate over each item in array and  execute function for each element in iterable.

Syntax
arr.forEach(function callback(currentValue[, index[, array]]) {
    //your iterator
}[, thisArg]);

Example code:
const array = [1,10,6,45,32];
array.forEach((element,index)=> {
 console.log(index +' ' +element);
});

Above code execute function for each element of array and prints element value & index of element in array.
Different from basic for is,  execute function for each element without knowing size of iterable & improves redability and difference from and for..of  is also allows to get index of each element which is not possible in for..of.

Wrapping up
Javascript/typescript provides 4 different which can be useful in different way based on simplicity & redablity of code , performance of loop and sometimes based on situation like for..in used for go through each property of object or each index of indexed class/interface.. 

Tuesday, June 12, 2018

Way to handle Parallel Multiple Requests

In web application Multiple requests means when there is need of making more then one Http requests to get result response and display to end user on web page. Multiple requests can be
  • Dependent Request
    Http Request is dependent request when it waits for result which needs to be given by other Http request i.e. parent request. Read more about how to perform Dependent request in angular here : Angular Dependent Request
  • Parallel Request
  • When client code fire more then one Http request on server and that all fired request get executed on server simultaneously.
Parallel Http requests are required when application need to make simultaneously to get data and display result to end user. For Example - In online shopping application, on order history page when use clicks on old Order to get detail , details page should display order details with all products detail which is associated with order.
Mostly in application database when order get saved its will save order details with associated product ids not full product. so to achieve this requirement once order data available with product ids, client code need to get fire multiple requests basically for each product id to get detail of product associated with order.

Below picture shows how parallel request get executed by approach going to discuss below.


Below are the way client code make parallel Http request and handle response of the requests to display final result with help of RxJs functions.

1. MergeMap

RxJs function mergeMap allows to fire out multiple request and handle response of each request to produce result. Function flatten inner observable(s) and allow to control each observable. Read more : MergeMap

    import { mergeMap, catchError } from 'rxjs/operators'; 
    megeMapTest() {
    const prouctIds: number[] = [1, 2, 3];
    const requests = from(prouctIds)
      .pipe(
      mergeMap(id => this.productService.getProduct(id))
      );

    requests.subscribe(
      data => console.log(data), //process item or push it to array 
      err => console.log(err));
 } 

In above code, important thing to note out is mergeMap, it merges all parallel requests fired to get product in one observable stream (array of observable) and then allows that request to handle individually.


Advantage
a. One of the advantage with mergemap is, it create single stream of observable and allows to process response of each request individually.
So if there is any request fails i.e. throws server side error, then it doesn't affect other parallel requests. Failed request(s) call error function in above code and succeeded request calls success function. (Which is advantage over second approach i.e. forkJoin function discussed below)

b. mergmap function start processing request as it get response i.e. in case of multiple parallel request it process request which completes first ,doen't wait for other request to get completed. (Which is advantage over second approach i.e. forkJoin function discussed below)

Disadvantage
a. It doesn't preserve sequence (i.e. order in which it fire) of requests, means if there are 10 request fired parallelly then which request complete first will display result first.

Solution to this is

    import { mergeMap, catchError } from 'rxjs/operators'; 
    list: Product[] = [];
    megeMapTest() {
    const prouctIds: number[] = [1, 2, 3];
    const requests = from(prouctIds)
      .pipe(
      mergeMap(id => this.productService.getProduct(id))
      );

      requests.subscribe(
      data => {
        this.list.push(data);

        this.list.sort((a: Product, b: Product) => {
          const aIndex = prouctIds.findIndex(id => id === a.Id);
          const bIndex = prouctIds.findIndex(id => id === b.Id);
          return aIndex - bIndex;
        });
      }, //process item or push it to array 
      err => console.log(err));
 } 

above solution code sort order of received response using index of array.

b. megeMap only merge request of same return type only. To understand this have look to above code again, all request is going to return observable of Product type which is going to be return by getProduct method of productservice.

Making use of forkJoin function can resolve this issue. Which is second approach discussed below.

2. ForkJoin

RxJs function forkJoin take one or more observable as input and provide steam of observable as result, which contains value last value emitted by each  inputted observable to function. Read more : forkJoin

import { catchError } from 'rxjs/operators';
import { of } from 'rxjs/observable/of';
import { forkJoin } from 'rxjs/observable/forkJoin';
  forkJoinTest() {
    const prouctIds: number[] = [1, 2, 3];
    const productRequests = prouctIds.map(id => this.productService.getProduct(id).pipe(
      catchError(error => of(`Bad Promise: ${error.message}`))
    ));

    const requests = forkJoin(productRequests);
    requests.subscribe(
      data => console.log(data) //process item or push it to array 
    );
  } 

In above code, as per definition forkJoin takes observable requests as input and returns result.

Advantage
a. forkJoin  reserve sequence (i.e. order in which request sent), so order in which requests inputted to forkJoin in same order it gives response result.

b. forkJoin can take multiple request which returns different type observable.

async forkJoinTest() {
    const customerRequest =this.customerService.getCustomer(1).pipe(
      catchError(error => of(`Bad request: ${error.message}`))
    );    
    const orderRequest =this.orderService.getOrder(1).pipe(
      catchError(error => of(`Bad request: ${error.message}`))
    ); 
    const productRequest =this.productService.getProduct(1).pipe(
      catchError(error => of(`Bad request: ${error.message}`))
    );

    const requests = await forkJoin(customerRequest,orderRequest,productRequests).toPromise();
    
    console.log('Customer ' + requests[0]);
    console.log('order ' + requests[1]);
    console.log('product ' + requests[2]);
  } 

In above code , forkJoin takes three requests (customer, product, order) which returns different type of observable. Also code make use of async/await advance typescript/javascript concept, which allows to wait till request completes. (Which is advantage over first approach i.e. mergeMap function discussed below)

Disadvantage
a. forkJoin waits for all inputted Http requests to get completed before calling subscribe function. So even though some request get completed it has to wait till other or lets say last request to complete. (This can be avoided with mergeMap function as it process requests as it get completed).

b. if one of the inputted request to forkJoin fails , then forkJoin also fails and return error even other inputted request completed successfully. To check run code as below and return error from server

import { catchError } from 'rxjs/operators';
import { of } from 'rxjs/observable/of';
import { forkJoin } from 'rxjs/observable/forkJoin'; 
  forkJoinTest() {
    const prouctIds: number[] = [1, 2, 3];
    const productRequests = prouctIds.map(id => this.productService.getProduct(id));

    //.pipe(
    //catchError(error => of(`Bad Promise: ${error.message}`))
    //));

    const requests = forkJoin(productRequests);
    requests.subscribe(
      data => console.log(data), //process item or push it to array
      err => console.log(err) 
    );
  } 

In above code catchError function is commented, that means if any of request fails then forkJoin also fails and return that error. (this is not case with mergeMap)
To avoid the make use of catchError function as given in above code.

Which one is better
Both of them is not good or not bad. It all depends on requirement at the end. Because there might be case when have requirement to wait for all request to complete or want to parallely executed request which return different value or do not want to produce result if one of sent requests fails then go for forkJoin and there might be case when have requirement for do not wait till all request get compete or do not want to reserve order of request or want to process requests even one of the request fails then go for mergeMap.  

Tuesday, May 22, 2018

Factory Design Pattern With Generics

Factory Method design pattern is one of the highly used design pattern, which is used in project to centralize creation of similar family object in application. It's part of creation design patterns as it helps to create objects in application.


Why to Centralize Object creation with Facotry?

  1. To avoid object creation every where in application with New. 
  2. To create object at run-time which serves purpose, based on requirement (i.e. based on input parameters). 
Factory Pattern Implementation

Below is class diagram and code implementation of Factory pattern.

Below code, centralize creation of command objects with help of Factory design pattern. Code below works as below

  • Code below creates different command to perform task such as addemployee, editemployee etc.
  • It's scalable as if developer wants to add new command let's say deleteemployee then it require to create new DeleteEmployee command which inherits from ICommand as other commands do.
  • CommandFactory , its factory pattern base class which has method GetCommand to return requested command based on input string argument. Modification required in GetCommand method when new command need to be added in application.
  • Program is client class which make use of CommandFactory and execute returned command.

    class Program
    {
        static void Main(string[] args)
        {
            ICommand cmd = CommandFactory.GetCommand("AddEmployee");
            Console.WriteLine(cmd.GetType());
            Console.ReadLine();
        }
    }

    public class CommandFactory
    {
        public static ICommand GetCommand(string cmdName)
        {
            if(cmdName=="AddEmployee") 
            {
                return new AddEmployee();
            } 
     else if(cmdName=="EditEmployee") 
            {
                return new EdutEmployee();
            }

            return new NullCommand();
        }
    }

    public class NullCommand : ICommand
    {
        public bool CanExecute()
        {
             Console.WriteLine("Null command");
    return true;
        }

        public void Execute()
        {
           Console.WriteLine("Null command");
        }
    }

    public class AddEmployee : ICommand
    {
        public bool CanExecute()
        {
            //validation
   return true;
        }

        public void Execute()
        {
          //code to execute
        }
    }
 
    public class EditEmployee : ICommand
    {
        public bool CanExecute()
        {
            //validation
             return true;
        }

        public void Execute()
        {
          //code to execute
        }
    }

    public interface ICommand
    {
        bool CanExecute();
        void Execute();
    } 

Following are issues with above code
  1. One big issue with above code is , it's violate Open Close principle. Because whenever new command added in application, developer need to go to Command Factory and need to add if condition for creating it.
    For Example: when there is need of adding Delete command , developer need to open CommandFactory class and need to add if clause for that.
  2. CommandFactory, GetCommand takes string argument to create and return instance of command. If developer pass wrong string argument value it will end up with NullCommand object (which is based on Null object pattern).
    So its not type safe implementation.
  3. CommandFactory, GetCommand can only return ICommand. If developer added new property/method let's say xyz which is specific to command ex. AddEmployee, then developer cannot access it like addCommandObj.xyz as return Command is of type ICommand and it doesnt has that property. 
Generics Based Factory Pattern Implementation

Solution to problem listed above is make use of factory pattern using Generics. Below is diagram and code of implementation


    class Program
    {
        static void Main(string[] args)
        {
            ICommand cmd = CommandFactory.GetCommand<AddEmployee>();
            Console.WriteLine(cmd.GetType());
            AddEmployee addEmployeeCmd = CommandFactory.GetCommand<AddEmployee>();
            Console.WriteLine(addEmployeeCmd.NewEmployeeId);
            Console.ReadLine();
        }
    }

    public class CommandFactory
    {       
        //only create object of type which implement ICommand
        public static T GetCommand<T>() where T:  ICommand
        {
          //it create object using Template type T and by making use of reflection
          //once create factory this way there is no need to open it again for modification
            Type type = typeof(T);
            Object obj = Activator.CreateInstance(type);
            return (T)obj;
        }
    }

    public class EditCommand : ICommand
    {
        public bool CanExecute()
        {
            //validation
            return true;
        }

        public void Execute()
        {
            //code to execute 
        }
    }

    public class AddEmployee : ICommand
    {
        private int newEmployeeId;
        public int NewEmployeeId
        {
            get { return newEmployeeId; }
        }

        public bool CanExecute()
        {
            return true;
        }

        public void Execute()
        {
            //execute code to create employee
            this.newEmployeeId = 1;//created employeeid 
        }
    }

    public interface ICommand
    {
        bool CanExecute();
        void Execute();
    } 

Following are advantages (solutions for previous approach problem) of generics based implementation

  1. It doesn't violate open close principle as object get created using reflection and using Generics Template type T in CommandFacoty class - GetCommand method. Check CommandFacotry Class in above code.
  2. By making use of Generics, it makes CommandFactory strongly type and there is no need string as argument based on which GetCommand method creating object in previous implementation.
     public static T GetCommand<T>() where T:  ICommand 
    if you see signature of GetCommand now,  it force Template type T must implement ICommand interface and so that it only going to create object of types which implement ICommand.
  3. Now factory can return object of specific implemented type like AddEmployee
      AddEmployee addEmployeeCmd = CommandFactory.GetCommand<AddEmployee>();
    
    Above line of code in Program class Main method proves point that now factory can return implemented type that can also be convert to to parent type ICommand.
Wrapping up
Factory pattern is one of the highly used deign pattern which used in most of the application to create and centralize object creation. So when it written not strongly type based way can lead to problem. So it's better to implement it strongly type based way (Generics implementation) to avoid issues and it helps to stick your code with SOLID principle.


Sunday, May 13, 2018

Angular Application Structure

Setting up application structure of application is one of the most important part of application development. Because well structured application allows to scale/grow application with less efforts, saves lot of effort in maintenance of application, allows to locate files and resources easily.

No framework forces to follow how to structure application (how to arrange files in different parts of application) , same goes for Angular 2 framework. It doesn't force developer to structure application, like how to arrange components, directives, pipes, services etc. created by developer. But angular team propose guideline one must follow for structuring application in style guide here : StyleGuide

Application Structure

Below diagram is visual presentation of structure of Angular application, which is as per the guide lines from angular team.


Application Module - It's Start point of angular application. This is first module get called when application get loaded. This module automatically get created when application created with the help of Angular-cli.
Point to note , all feature modules and core module is going to register themselves in this module.

Core Module - In angular application, It's module going to have application level singleton services (Ex. HttpInterceptor used for intercepting http request, LoggerService,  LoggedInUserService) or application level component (Ex. Navigation Bar).

Core Module have all singleton services,  so only the root AppModule  (Application Module) should import the CoreModule to make same instance of service in all modules of application. If a lazy-loaded module imports it too, lazy module will create its own instance of core module services and use that newly created instance of services instead of application level singleton services.  To avoid that problem make use of forRoot method and guard clause, code for that given below. https://angular.io/guide/singleton-services

@NgModule({
  imports: [CommonModule]
  declarations: [XyzComponent],//needed if there component
  exports: [XyzComponent]//needed if want to export component
})
export class CoreModule {

  constructor (@Optional() @SkipSelf() parentModule: CoreModule) {
    if (parentModule) {
      throw new Error(
        'CoreModule is already loaded. Import it in the AppModule only');
    }
  }
 
  static forRoot(): ModuleWithProviders {
    return {
      ngModule: CoreModule,
      providers: [
        LoggerService ,UserService
      ]
    };
  }
}

Shared Module - In angular application, It's module going to have all dump angular Pipes, Directives , Components, Function  etc. i.e. all who are dumb and receive input from, component which uses it.  Ex. Extended Form Validation Component (Check Here), Confirmation Model Popup, Formatting Pipes,  Validation &  Common functions used through out application, Directive used by controls etc its like utilities used in application .
Point to note, It should not going to have angular services.

Feature Modules - In angular application, Feature modules are going to have have features which is going to be provided by application.   (Ex. CustomerModule, OrdersModule, ProductsModule, ShippingModule).
This features modules also going to have shared features modules in which is going to be shared between this features module only. For Example. ProductDataService module which is going to be shared between ProductModule and OrderModule.

Module Dependency ( Flow of Services ) 

Below diagram shows dependency between modules (i.e. it shows the flow of services) discussed above.


Hows modules dependent or Service flow

Feature Modules - these modules are going to consume singleton services form Core Module (Via application module in which it registered) and shared dumb pipes, component, directives, functions from shared module.
Which means Feature modules depends on Core Module and Shared module i.e. service flow from core & shared modules to feature modules.
Important point to note here is, Service flows from top towards bottom, not from bottom to top. This means top level Core module, Application module and shared module must not consume service from feature modules.

Core Module - this module going to consume service from shared module if needed. Mostly it's doesn't need service from shared module but sometime need to access common function or formatting pipes for its component , that's why diagram has dotted line.
So service flows from shared module to core module if needed, otherwise this is independent module which provides application level singleton services and component. 

Application Module - this module is simple module just going to to have one component  to provide start point of application. It's going to consume services from Core Module and if needed consume services from shared module.

Shared Module - It's utility module. This module have all the dumb angular components, pipes , directives  and utility functions. So this module provides its services to all the modules (Application Module, Core Module, Feature Modules) in applications.
But its not going to consume service from other modules.

Conclusion
Angular framework doesn't force developer to follow discussed structure for developing application. But it's must need when application going to grow & developer wants to scale it up, and also helps in identifying different part of application in turns helps in maintaining application.

Putting component, service, pipe, directives in proper folder structure its not end of story. To make property structure developer must need to setup dependency properly between module i.e. flow of service as discussed.

Note
Above article is based on my reading on angular.io portal and structure applied in my application. Please comment if something wrong.

Sunday, April 22, 2018

Angular Dependent Request

In software application, screen(s) where to display data application needs to make dependent request i.e. First have to make Request A (to server or database), based on result of A request data have to make Request B.

Example : In shopping application, on product screen , when user select product it will display product details and based on product make region it also display in which region it available or which region it's available.

So achieve in application there is need of dependent request , which works this way

  1.  It request (server/database) to get full product detail
  2. Based on product region , it makes request (server/database) to get available regions  

In code most of the developer write below code

this.productService.getProduct(1)
 .subscribe(data => {
          this.product = data;
          this.productService.getAvailableRegion(data.regionId)
                   .subscribe(region => this.avilableRegion = region);
}); 

code above does the task. But its complex (in terms of readability)  and not easy to understand when there is more depedent request are there  (if there are more dependent request like Request C , depends on Request B and which depends on Request A) as it goes deep and deep for each request.

Below are some way to avoid complexity and easy to understand code.

RxJs Way
Above example just make use of one RxJs function which subscribe, and does thing in that function only. For second request (dependent request) it does same thing which makes code complex. But RxJS provides number of functions apart of subscribe  which make things simple. Below is code how to reduce complexity of above code by making use of other function provided by Rxjs.

this.productService.getProduct(id)
  .pipe(
       map(data => this.product = data),
       switchMap (cust => this.productService.getAvailableRegion(this.product.regionId) )
   ).subscribe(region => this.avilableRegion = region); 

this does the same task as above code, but better way. Following functions to not down which makes code easy
  1. pipe - its RxJs function which allows number of RxJS function as input and combine them to perform operations one by one on observable received from previous function. 
    In above code it combines map and switchMap RxJs operator.
  2. map - it used to map returned observable value to other value. In this case it maps returned response to product.
  3. switchMap - it used for switching from one observable to other observable, in this example it switch from product to list of regions.
  4. Finally subscribe - this allows to subscribe to response observable stream of provided from pipe function after operation done in it.
Advance Typescript (async/await on Promise)

Another way to achieve same is make use of advance typescript concept , which making use of async/await. Below is code for the same

async getDetails(id) {
   this.product = await this.productService.getProduct(id).toPromise();
   this.avilableRegion = await this.productService.getAvailableRegion(this.product.Id).toPromise();
} 

Points to note with this approach is:

  1. async/await is used with Promise object only. 
  2. In code, promise object got created from returned observable by making use of toPromise method.

when method getDetails called from anywhere in code, executing stops when await keyword got encountered, and it waits till getProduct server request returns. Execution get resumed once server returned response which in this case return product. Then it stops execution again on encounter of await, which used to wait till availableResion request retuns.

At the End 

So there are two approach

  1. RxJs and 
  2. TypeScript 
none of them is better then another one , it all on developer preference. But both the way it makes code simple and easy to understand. It also help developer in maintaining code for long time as not much complexity involved. 


Saturday, March 31, 2018

Angular Custom Validation Component

Full Source at GitHub : AdvCustomValidationComponent

Validation is very important feature of application which allows to data entry (allows to enter data in application) as invalid data can leave application in inconsistent state, invalid date entry crash application and if data is not validated it can allows injection attacks on application. In Web application validation can be done at server side (i.e. on server like IIS, apache in language C#, PHP etc.) and at client side (i.e in browser windows using javascript).

Here, following post is about validation in Angular 2 application , which means its about validation on client side not about server side. Angular framework allows to do validation following two way
  1. Template Driven Form
  2. Reactive Form
One of this approach or mix of both approach can be used in application for validation. Not going to discuss about it as it provided in detail over here : Forms & Validation. But following post is going to discuss about custom component, which works with both the validation approach provide by angular 2 framework and encapsulate validation code in it.

Custom Validation Component
Let's first create validation component and make use of it in application. For fresh start of application follow this post : My first Angular 2 app - tutorial. After creating application create shared module in application by running below command in integrated terminal of visual studio code.
 ng g module shared.

Shared module is where custom validation component will resides , as custom validation component is dumb and its going to be used by multiple features in application. Run command on integrated terminal create
 ng g component shared/custom-input 
custom validation component.

custom-input.component.html
 <div class="form-group" >
  <label class="control-label">{{label}}</label>
  <br />
  <div [ngClass]="{'has-error':isError}" >
    <ng-content></ng-content>
    <ng-container *ngIf='isError'>
      <span class="text-danger" *ngFor="let msg of errorMessages"> {{msg}}</span>
    </ng-container>
  </div>
</div> 

Above is modification done in component html, some of the points to note in html are
  1. ng-content - which is very important tag in this html and important for validation component. This Angular 2 Framework tag allows to push any content in html when component loaded. For example:
    <custom-input>
      <input inputRef class="form-control" type="text" />
    </custom-input> 
    when above code written in component it will become like this,

    so input element put inside in ng-conent when component loaded in html page.
  2. inputRef its directive associated with input element, that intrun allows to access input element in comoponent typescript (more discussed below). 
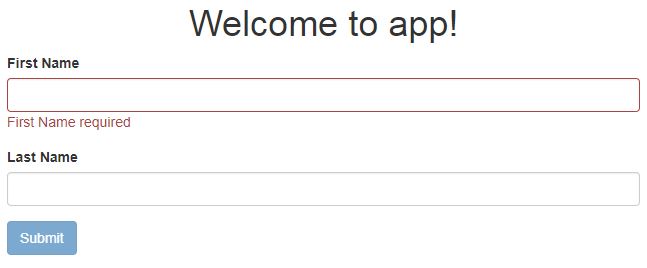
  3. When custom component render in browser it look as below:

    So, html tags in component will create structure above as shown in below image 

    image above explain all the tags which made up component template. Just to note few points
    1. Border around the text box controls comes when text box becomes invalid. Border to textbox get applied by 'has-error' class , which get applied isError becomes true (in which case it becomes true described by code in typescript file below),
    2. "First Name Required"- this message comes when there is error i.e. in this image it error related to required validation. This passed as input to component described below
    3. label,(First Name) - will come from typescript associated with component template. This passed as input to component described below.
custom-input.component.ts
@Component({
  selector: 'custom-input',
  templateUrl: './custom-input.component.html',
  styleUrls: ['./custom-input.component.css']
})
export class CustomInputComponent implements OnInit {
  @Input() label: string;
  @Input() validations:  { [index: string]: string};
  @Input() info: string;

  @ContentChild(InputRefDirective) input: InputRefDirective;

  get isError() {
    return this.input.hasError;
  }

   get errorMessages() {
    const errors = this.input.errors;
    const messages = [];
    const keys = Object.keys(this.validations);

    keys.forEach(key => {
        if (errors[key]) {
          messages.push(this.validations[key]);
        }
      });
    return messages;
  }

  ngOnInit() { }

  constructor() { }
} 

Above is Component Typescript file , code in file handles all the backend logic to control Component invalid/valid state, putting red border around control when there is error and displaying error message when control is in invalid state.

Type Name Description
Input


label display label text for control E.x. First Name in above image

validations its indexed object hold validations associated with input tag of component
E.x. {'required' : 'First Name required', 'minlength': 'Minimum lenght is 3 char'}
Note: indexed property name must need to match with type of validation E.x. 'required' key match with required validation 

info
variable


input this component variable allows to get access to input control (which replaces ng-content in template of component) associated with component, for example above image in this case 'input textbox'.
Properties


isError component property which  find input element (with help of input directive) and get element has error or not, which in turn helps to put red border around input control

errorMessages component property which access errors associated input element (with help of input directive) and with help of input property validations object find proper error messages and return to display all. 

Important thing to not here is InputRefDirective , which access input control. Below is code for input-ref directive.

input-ref.directive.ts ( created by ng g directive directive/InputRef )
import { Directive } from '@angular/core';
import { NgControl } from '@angular/forms';

@Directive({
  selector: '[inputRef]'
})
export class InputRefDirective {

  constructor(private formControl: NgControl) {
  }

  get hasError() {
    return this.formControl.dirty && this.formControl.invalid;
  }

  get errors() {
    if (this.hasError && this.formControl.errors) {
      return this.formControl.errors;
    }
    return '';
  }
}

Important part of input-ref directive is, with help of constructor injection (by using angular framework injection) NgControl get injected in the input-ref directive. By doing that directive class get access to input control.

Type Name Description
Properties


hasError property return true (when control is dirty and invalid state) or flase , to indicate there is error or not

errors property returns list of errors associated with input control

So its end of creation of validation component and its related directive. Now let's see how to use it in application.

app.component.html
Reactive Form
<form class="needs-validation" [formGroup]="detailForm" novalidate>
    <custom-input [label]="'First Name'" [validations]="{required:'First Name required'}">
      <input inputRef class="form-control" formControlName="firstName" type="text" />
    </custom-input>
    <custom-input [label]="'Last Name'" [validations]="{required:'Last Name required'}">
      <input inputRef class="form-control" formControlName="lastName" type="text" />
    </custom-input>
    <div>
      <button [disabled]="detailForm.invalid" type="button" class="btn btn-primary">Primary</button>
    </div>
</form>

Component.ts for Reactive form only 
code below create form reactive way - point to note here no much code to access control and display error (discussed below in advantages).
export class AppComponent implements OnInit {
  title = 'app';
  detailForm: FormGroup;

  constructor(private fb: FormBuilder) {
    this.createForm();
  }

  ngOnInit() {
  }

  private createForm() {
    this.detailForm = this.fb.group({
      firstName: new FormControl('', [Validators.required]),
      lastName: new FormControl('', [Validators.required]),
    });
  }
}

Template Driven Form
<form class="needs-validation" #detailForm="ngForm" novalidate>
    <custom-input [label]="'First Name'" [validations]="{required:'First Name required'}">
      <input inputRef class="form-control" [(ngModel)]="firstName" name="firstName" type="text" />
    </custom-input>
    <custom-input [label]="'Last Name'" [validations]="{required:'Last Name required'}">
      <input inputRef class="form-control" [(ngModel)]="lastName" name="lastName" type="text" />
    </custom-input>
    <div>
      <button [disabled]="detailForm.invalid" type="button" class="btn btn-primary">Primary</button>
    </div>
</form>

It's not full template of application component code, but it part of template which uses Custom validation  component in both ways Reactive Form and Template Driven Form way. So not much change in both way, except change forced by reactive form approach and template driven form approach.

Not much in app.component template to discuss as already discussed before in post. app.component template make use of custom validation component and pass all required input values (label, info and validation error).

Below is image of final form after doing all changes


Advantage of using Custom validation component

  1. Less code in component template,
    Template driven from
     <label class="control-label">First Name</label>
      <input
      type="text"
      name="firstName"
      [(ngModel)]="firstName"
      minlength="2"
      required>
    
    <div *ngIf="firstName.errors?.required && firstName.touched && firstName.touched" 
    class="label label-danger">
      Name is required
    </div>
    <div *ngIf="firstName.errors?.minlength && firstName.touched && firstName.touched" 
    class="label label-danger">
      Minimum of 2 characters
    </div>

    Reactive from
     component.ts
    
     this.detailForm = this.form.group({
           firstName: [null, Validators.compose([Validators.required, Validators.minLength(2)])],     
        });
    
    component.html
    <label class="control-label">First Name</label>
    <inpu.
      type="text"
      name="firstName"
      [(ngModel)]="firstName"
      minlength="2"
      required>
    
    <div *ngIf="detailForm.get('firstName').errors?.required && detailForm.get('firstName').touched && detailForm.get('firstName').touched" 
    class="label label-danger">
      Name is required
    </div>
    <div *ngIf="detailForm.get('firstName').errors?.minlength && detailForm.get('firstName').touched && detailForm.get('firstName').touched" 
    class="label label-danger">
      Minimum of 2 characters
    </div>  

    If there is no custom validation component , in both the way (Template driven or Reactive way) one need to write down separate div for displaying each error input control has, for example (div for required error and div for minlength).
    But with custom validation control, there just need of passing validations in validations-property of control and it will take care of it.
        <custom-input [label]="'First Name'" 
                   [validations]="{required:'First Name required', 'minlength':'Minimum of 2 characters'}">
          <input inputRef class="form-control" [(ngModel)]="firstName" name="firstName" type="text" />
        </custom-input>
    

    Event there is no need to write extra label tag for displaying label for input control. This also taken care by custom validation control label-property.
  2. Second major difference is, custom validation control encapsulate code of validation in one place only for full application. That means there is no need to write validation code in template in each and every data entry form.

Wrapping up
Custom validation control is easy and simple to use. It makes use of some advance stuff like ng-content, directive to get input control under the hood and encapsulate thing in it. Once control included in application it reduce amount of validation code & effort to write validation code in every data entry form.
Full Source at GitHub : AdvCustomValidationComponent